Monday, August 30, 2010

Beef Caldereta


Caldereta is a popular Filipino beef stew. There are different kinds of beef stews found in Filipino cuisine, but this is the most common one found in most Filipino kitchens. This is made with either beef or goat meat, which I don't really eat nor is it readily accessible.

Caldereta is one of hubby's favorite Filipino dishes, so it was really a mission of mine to find the right recipe to 'wow' him. This is my first attempt at making Beef Caldereta from scratch. I've always made caldereta using the seasoning packet found at the Filipino stores and am never happy with it. It just doesn't taste as good as the homemade version. It always tastes like it came out of a box. So I vowed not to make Caldereta anymore until I find a tried and true recipe.

My mom and lola used to make Caldereta when I was kid and they would add pan de sal in the stew. Unfortunately, I never learned the recipe from my lola. I asked my mom to teach me her recipe, and she briefly told me to make sure to add liver spread. So I found this recipe that called for liver spread. I modified the recipe a bit. The meat didn't come out as tender as I'd like it to be, but I think it would be perfect if I cooked it in the crockpot for 8-10 hours. I think I'll do that next time. All in all, it came out very tasty. Just the right flavor I was looking for. Now THAT'S Caldereta. We'll have to see if hubby approves of this. He's at school this evening and won't be tasting this until lunch tomorrow. So we'll see what he says.

4 lbs. beef stew meat
1 (8 oz) can liver spread or ground liver
1 large onion, minced
5 cloves garlic, minced
4 medium tomatoes, diced
2 (8 oz) cans tomato sauce
2 green bell peppers, sliced into strips
2 red bell peppers sliced into strips
2 hot chili peppers, minced
3/4 cup shredded cheddar cheese
3/4 cup spanish olives (optional)
2 medium potatoes, peeled and cut into large chunks
2 medium carrots, peeled and cut into large chunks
2 cups water or beef broth
1/4 cup oil
salt to taste

1) Heat oil in a stock pot on medium heat. Add onions and garlic and cook for a minute. Add tomatoes, red and green peppers and chili peppers. Cook for another minutes.

2) Add beef, tomato sauce, liver spread, and water or broth. Season with salt to taste. Simmer for 1 - 2 hours until meat is tender. After cooking for 1/2 hour, add potatoes and carrots and continue to simmer.

3) Add cheese and olives and continue to cook until sauce thickens. Serve with white rice.

Chocolate Cake Bon Bons


I made a large batch of chocolate cupcakes last week, with half of it being presentable enough to give to my co-workers. The other half didn't look as pretty but was still really delicious. So I have kept them in the fridge for about a week, with the plan of making cake balls with them one day. I bought some ready-made chocolate frosting, so I figured that now was the time to finally make them.

The concept is similar to my Red Velvet Cake Bon Bons. You can use a boxed cake mix or make it from scratch. But you have to use the store-bought frosting so that the bon bons will hold better at room temperature. However you make it, it will turn out rich and delicious. These will definitely be a crowd-pleaser.

1/2 of a prepared chocolate cake (I used the cake from Chocolate Cake with Chocolate Cream Cheese frosting)
1/2 tub store-bought chocolate frosting (or marshmallow fluff)
1 package semi-sweet chocolate chips

1) Crumble cake until it becomes sandy. Add chocolate frosting. Mix until well incorporated (you may have to use your hands for this). Form into 1-inch balls and place on a cookie tray lined with wax paper. Refrigerate for an hour.

2) Place chocolate chips in a microwave-safe bowl and heat for a minute. Stir. Continue heating in 30-second increments then stirring, until the chocolate is all melted.

3) Coat cake balls in melted chocolate and place back on wax paper. Refrigerate until chocolate has hardened.


Thursday, August 26, 2010

Grilled Chicken Pesto Panini


Say THAT 3 times. What a tongue twister.

I made some of my Basil Pesto a couple of days ago and had some more leftover. I wanted to find creative ways to use it up other than just tossing it in some pasta. And then I remembered that I had mentioned that pesto would go perfect in a sandwich. So I decided to be innovative and created one.

Its really delicious, flavorful, and more than anything, really easy to make. Perfect for an evening like tonight, where I don't really want to have too many steps to make dinner. Hubby likes this one.

2 boneless, skinless chicken
salt and pepper to taste
sliced cheese (such as provolone, mozzarella, swiss or any other gooey kind of cheese)
sliced wheat bread (or any kind of bread you like)
2 Tbsp. prepared pesto
lettuce leaves
tomato slices

1) Heat grill to medium heat. Season chicken with a good amount of salt and pepper. Cook chicken until done, about 5-7 minutes on each side. Remove from heat and let sit for about 5 minutes. Cut into slices.

2) To assemble the sandwiches, place a slice of bread down. Top with cheese, tomato, and sliced chicken. Top with a 1/2 to 1 tablespoon of pesto, and place lettuce leaves on top. Place another slice of bread on top and put the sandwich on a sandwich press. If you don't have a sandwich press, like me, put it on the grill. Place a heavy pan on top of the sandwich and hold it down with a heavy can. Grill on both sides until heated through.

Sunday, August 22, 2010

Arroz con Pollo (Chicken and Rice)


Man, I am on a roll! This is my third new recipe today. I think I'm using newer recipes more in the beginning of the week because hubby is back in school again. His classes are scheduled more in the middle of the week where I don't have too much time to experiment.

Anyway, I've been dying to make Arroz con Pollo for a long time, but I somehow convince myself not to because it just reminds me of my Paella recipe. I thought, why make another rice dish that tastes the same? But I was watching a show on the Cooking Channel where they were making it, and so it inspired me to give it a try for dinner tonight.

I've seen quite a few recipes online, but I found this recipe from the Cooking Channel. I've modified the original recipe because I didn't have some of the ingredients it called for. I also cut the recipe in half. It came it out quite tasty and it won the approval of hubby and daughter. Its definitely different from paella.

1/4 cup achuete oil (annato seeds cooked in oil)
3 boneless, skinless chicken breast, cut into large chunks
salt & pepper to taste
1/4 cup sofrito
1/2 tsp. cumin
pinch of ground cloves
2 cups long grain rice
3 cups chicken broth
3/4 cup frozen peas and carrots
1/2 red bell pepper, cut into strips


Sofrito
1 medium onion, cut into large chunks
8-10 garlic cloves, peeled
1/2 bunch cilantro, washed
2 plum tomatoes, cut into large chunks
1/2 red bell pepper, cut into large chunks

1) First make the sofrito by combining all its ingredients in a food processor and puree until smooth. Set aside.

2) In a wide, shallow pan, heat half of the achuete oil. Season chicken with salt and pepper and cook in the oil for about 5 minutes until it starts to brown. Remove from heat.

3) Heat the remaining oil in the same pan and add the sofrito. Season with salt and pepper. Increase the heat to high and boil until water has evaporated. Add cumin and cloves.

4) Stir in rice until it is coated with the sofrito mixture. Stir in the cooked chicken. Add chicken broth and bring to a boil. Continue cooking until the liquid reaches the level of the rice. Gently stir in peas and carrots and reduce the heat to low. Cover the pan and cook until the liquid is absorbed, about 15-20 minutes. Fluff with a fork and serve.


Ube Cake Roll


For those who've been following me and know me, I'm a huge fan of fusion food trucks. I haven't had a taste of their foods yet, but The Manila Machine is one that I'd also like to try. They have Ube cupcakes as one of their desserts. What a great idea!

Ube, also known as purple yam, is like a sweet potato and is used in many filipino desserts. Ube cakes are one of my favorite filipino desserts. So when I heard about ube cupcakes, I thought it was a great idea to try to make something like that. But before venturing into the cupcake version, I wanted to try making an ube cake roll using the base for my Pumpkin Cake Roll.

Its pretty much the same concept as the pumpkin cake roll, except ube doesn't have cinnamon, so I eliminated that. The flavor was quite good, but I was a little unhappy with how the color turned out. It didn't have the bright purple color that I was accustomed to in ube cakes. It came out more brown that anything. I may have to adjust the food color a little bit more. But I'll definitely make another attempt to make this and improve the recipe.

3 eggs
1 cup white sugar
2/3 cup ube puree (fresh or frozen)
3/4 cup all-purpose flour
1 teaspoon baking soda
12 drops red food coloring
12 drops blue food coloring
confectioners' sugar for dusting

1 cup confectioners' sugar
3/4 teaspoon vanilla extract
2 tablespoons butter, softened
8 ounces cream cheese
Directions

1) Preheat oven to 375 degrees F. Grease a 15x10x1 inch baking pan and line with parchment paper. Grease and flour the paper.

2) In a large bowl, beat eggs on high for five minutes. Gradually add white sugar, ube and food coloring. Add flour and baking soda. Spread batter evenly in pan. Bake for 15 minutes or until cake springs back when lightly touched.

3) Immediately turn out onto a linen towel dusted with confectioners sugar. Peel off paper and roll cake up in the towel, starting with the short end. Cool.

4) To Make Filling: Mix confectioners sugar, vanilla, butter or margarine, and cream cheese together till smooth.

5) Carefully unroll the cake. Spread filling over cake to within 1 inch of edges. Roll up again. Cover and chill until serving. Dust with additional confectioners' sugar, if desired.


Filipino-style Fried Chicken


Hubby, daughter and I are having a lazy Sunday today. When we have lazy Sundays, I usually prepare good meals. For breakfast, I made chocolate chip pancakes and banana pancakes using my pancake recipe. Then lunchtime came and I couldn't figure out what to make. Our lime tree is growing some good limes and I have some chicken wings in the fridge. hmmmm...... I haven't made Filipino fried chicken yet, so why not make it.

My dad has been telling me how my daughter loves his Filipino fried chicken. And mine didn't fail today and Hubby really liked it too. Its a really simple dish to make. I used lime on this dish because I had some, but you can definitely use lemon as well. This is definitely going to make rounds more often.

1-2 lb. chicken wings
1/4 cup lime juice (or lemon juice)
1/4 cup soy sauce

1) Place wings in a freezer bag or bowl. In a small bowl, combine lime juice and soy sauce and pour over chicken. Marinate for 1-2 hours.

2) Remove chicken from marinade and pat dry. In a pan, heat 3/4 cup oil on low-medium heat. Fry chicken for 3-4 minutes on each side. Serve with rice.

Monday, August 16, 2010

Larb


Larb is a Thai version of a Chicken Lettuce wrap. I was just recently introduced to this dish a few months ago when my cousin's wife made it for a dinner party they had at their place. She quickly told me how to make it, but I wasn't able to write down the recipe. I did remember that she added a toasted rice-type of powder. So I searched for a recipe that was somewhat similar to hers and found this recipe.

Larb (or Laab as the Thais say it) can be served as an appetizer or side dish or a whole meal in itself. You can use any type of ground meat you have, such as chicken, pork, turkey or beef. I always have ground turkey in the freezer, therefore its what I used today. Its a really light dish with a salty and sour taste. I modified the original recipe a bit by cutting the fish sauce in half because I found it to be too salty. But the dish was quite refreshing for this warm summer evening.

2 Tbsp. toasted rice (1/4 cup uncooked rice, toasted until golden brown, then ground in a food processor or coffee grinder)
1 tsp. oil
2 Tbsp. water
1/2 lb. ground meat (turkey, chicken, pork, or beef)
1/4 cup thinly sliced red onion
1-2 limes
1/4 tsp. ground chili pepper (more if you like it very spicy)
1-2 Tbsp. fish sauce (depending on how you salty you like it)
5 sprigs cilantro, chopped
3 sprigs mint (optional for garnish)
1 green onion, sliced (optional for garnish)

1) Marinate meat with juice of 1/2 a lime for a few minutes while you prepare the rest of the ingredients.

2) Heat pan or wok on high and add water and oil. Immediately add marinated meat and stir until thoroughly cooked and no longer pink.

3) Remove meat from heat and place in a large mixing bowl. Add all the remaining ingredients and mix well until incorporated. You can add more or less of the fish sauce and lime juice to your taste. Garnish with fresh sprigs of mint and sliced green onions and serve with lettuce or cabbage leaves.


Thursday, August 12, 2010

Popcorn Krunch


I found this recipe on the Betty Crocker website. Its really easy to make because it only has 3 ingredients. The original name for this yummy snack was 3-Ingredient Snack Mix. Sounds boring. So I asked hubby to name it and he came up with Popcorn Crunch.

This snack is reminiscent of a Rice Krispies treat and is very addicting. Once you start it, you can't stop eating it. We're heading out of town this weekend and I decided to make this to munch on for the road trip. But I'm not so sure it'll last until then.

6 cups prepared, light-buttered popcorn
4 cups Chex cereal (Wheat, Rice or Corn)
1 jar marshmallow fluff

1) Preheat oven to 350 deg F. Grease a cookie sheet. Combine popcorn and cereal in a large bowl. Set aside.

2) Microwave marshmallow in another bowl and heat on high for about a minute. Stir and continue microwaving for another minute until melted. Stir again. Pour over popcorn mixture and combine until evenly distributed. Spread mixture evenly on cookie sheet.

3) Bake for 5 minutes. Stir and continue baking, while stirring every 5 minutes until marshmallow turns lightly brown, about 15 minutes. Spread over wax paper or aluminum foil and completely cool. Once cooled, break up the large chunks into smaller pieces and store in an air-tight container for up to 2 weeks.


Wednesday, August 11, 2010

Leche Flan


We're having a breakfast potluck at work tomorrow and I was asked to make a Flan. "Flan for breakfast??? Whatever tickles your fancy!" Flan is a custard that has a Hispanic origin. That being said, it found its way into Philippine cuisine and became Leche Flan.

Leche Flan is a popular Filipino dessert that frequents itself in many Filipino functions. I see it so often that I don't have a need to crave for it. This is actually my mom's recipe and is quite easy. Its a super rich dessert, unlike other flans I've had. And it was a hit at the breakfast.

8 egg yolks
1 (12 oz) can evaporated milk
1 can condensed milk
1 tsp. vanilla extract
3/4 cup sugar

1) Preheat oven to 400 deg. F.

2) Combine all ingredients, except sugar, in a bowl and mix with a wire whisk until well blended. Set aside.

3) In a medium saucepan, heat sugar on medium heat until it browns and becomes a syrup (note: do not mix sugar until the very end, where the sugar is almost completely brown). Pour syrup in a 9-inch round pan and evenly spread on the bottom. Cool to harden like candy.

4) Strain egg mixture into prepared pan with syrup. Slowly place pan in a roasting pan, large enough to fit the prepared pan. Fill the roasting pan with warm water, about half way up the prepared pan. Bake for 1 - 1 1/2 hours.

The flan is done when you place a toothpick in the center and it comes out clean. Cool completely and invert on a serving tray when ready to serve.


Sunday, August 8, 2010

Grilled Chicken Banh Mi (Vietnamese Sandwich)


One of my favorite sandwiches is Banh Mi. Its a Vietnamese sandwich, influenced by the french when Vietnam was once colonized by France. My co-worker first introduced me to this a few years ago and its been my favorite ever since. Unfortunately, there isn't many Vietnamese sandwich places in our area and the sandwich place she took me to is a little far from home, so I don't get to eat it often. The ones that are somewhat near home isn't as good. Needless to say, its been a while since I've had a Banh Mi.

I was surfing for some new recipes and found this one. I think the hardest part of making this is cutting the carrots and daikon. Luckily, I have my handy-dandy food processor that I absolutely love using. This sandwich came out so delicious, its almost comparable to the sandwiches my co-worker introduced me to. I think I may have found my new favorite Banh Mi. However, I feel the need to add a disclaimer regarding the pickled vegetables......the daikon reeks after its marinated. Its delicious with the carrots and pickling juices, if you can get passed the putrid odor. So, I'll probably be eliminating the daikon the next time I make this.

Marinade
1 cup fish sauce
1 cup lime juice
1/2 cup sugar
8 cloves garlic, minced
2 red Thai chilis, thinly sliced (more if you like it more spicy)
1 Tbsp. salt
8 boneless skinless chicken

Pickled vegetables
1/2 cup water
1/4 cup rice vinegar
1/4 cup sugar
1/2 tsp. salt
pinch of crushed red pepper
3 large carrots, julienned
1/4 lb. daikon radish, julienned

4, 8 inch baguette, split and grilled
mayonnaise
1 cucumber, thinly sliced lengthwise
10 cilantro sprigs
1 jalapeno, thinly sliced

1) For the marinade: In a bowl, whisk together fish sauce, lime juice, sugar, garlic, chilies and salt. Place chicken in a resealable plastic bag with the marinade. Refrigerate for at least 3 hours.

2) For pickling the vegetables: In a small saucepan, combine water, vinegar, sugar, salt and crushed red pepper. Bring to a boil. Remove from heat and cool to room temperature. Add carrots and daikon and cover to keep submerged. Refrigerate for at least 30 minutes and up to 3 days.

3) Heat grill. Remove chicken from marinade and pat dry. Grill chicken over medium heat, turning once, until cooked through, about 14 minutes. Remove from heat and rest for 5 minutes.

4) Drain 1 cup of the pickled vegetables. Slice chicken. Spread mayonnaise on each side of baguette. Place cucumber on bottom half. Top with chicken, pickled vegetables, cilantro and sliced jalapenos. Serve.

Tuesday, August 3, 2010

Singapore-Style Noodles


I absolutely love the new Cooking Channel. The chefs/cooks on that channel seem so much more down to earth than those on the Food Network (although they are sister stations). And a little more diverse in flavor. They have Indian, Chinese, Caribbean, English, Italian, and American cuisine that they feature on their shows.

I like watching Ching-He Huang. An England-based Chinese cook who makes Asian "take away" food look so simple. I found this in her recipe collection and wanted to give it a try. I first had Singapore-style noodles at a buffet that hubby's cousin took us to when we were in Vegas and really liked it.

I've learned that foods from Singapore or any Malay countries have heavy influences from Indian cuisine. You can see the Indian influence in this dish by the vibrant color of yellow from the Turmeric. It looks like a lot of ingredients, but its really easy to make. You just have to have all your ingredients ready. This dish had a slight spice to it, so I lessened the chili, but you can definitely add more to your liking. However spicy, this is definitely a recipe I'd make again.

2 Tbsp. peanut oil (I just used Canola oil)
1 Tbsp. grated ginger
1/2 red chili, seeded and finely chopped
5 fresh shiitake mushrooms, sliced (I like mushrooms so I added more)
2 Tbsp. ground turmeric
3 1/2 ounces diced bacon
1 red bell pepper, seeded and sliced
1 handful julienned carrot strips
1 handful bean sprouts
3 1/2 ounces cooked chicken, shredded
9 ounces bean thread noodles, pre-soaked in hot water for 10 minutes then drained
1/2 tsp. crushed dried chilies (more if you like it spicy)
2 Tbsp. light soy sauce
2 Tbsp. oyster sauce
1 Tbsp. rice vinegar or cider vinegar or dry sherry
1 egg, beaten
dash of sesame oil
2 green onions, sliced

1) Heat oil in a wok or pan. Stir-fry ginger, chilies, mushrooms and turmeric for a few seconds. Add bacon and cook for less than a minute. Add red bell pepper, carrots and bean sprouts and cook for another minute, then add chicken. Stir well to combine.

2) Add noodles and stir fry well for about 2 minutes and season with dried chilies, soy sauce, oyster sauce and vinegar. Stir well.

3) Add in beaten egg, stirring gently until egg is cooked through, about a minute. Season with sesame oil. Top with green onions and serve immediately.


Monday, August 2, 2010

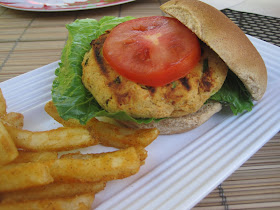
Grilled Salmon Burgers


I've been making these Salmon burgers for a while. I think I first started making them when hubby and I were on a diet kick and I was sick of just grilling our never-ending supply of Salmon that I bought at Costco. Well, I was at Costco the other day and came across some salmon. Hmmmm....I haven't made Salmon Burgers in a while, might as well grill some again.

This is a really quick and easy way to use up Salmon or any type of flaky fish that you might have. Yummy and healthy too.

2 1/2 cups flaked salmon (or a 14 3/4 oz canned salmon)
2 Tbsp. lemon juice
1 1/2 Tbsp. Dijon-style mustard (I used regular mustard)
3/4 cup dry breadcrumbs
1/2 cup sliced green onions
3 egg whites
salt & pepper to taste

1) Combine lemon juice and mustard. Blend together flaked salmon, breadcrumbs, green onions, and lemon juice with mustard mixture. Mix in egg whites until well blended. Add salt and pepper to taste.

2) Form mixture into patties and cook on a lightly oiled grill or saute in a skillet until golden brown on both sides. Serve on a bun with lettuce, tomato slices, and condiments.