Thursday, December 23, 2010

Chocolate Peppermint Cupcakes


The flavors of chocolate and peppermint seems to be an acquired taste. I happen to love the blending of chocolate and mint together. Its so festive. So when I came across this recipe from Beantown Baker, I decided to try this recipe out to serve as one of our desserts for our Christmas celebrations.

The cake came out so moist and delicious. And coupled with the minty fresh frosting made it a perfect combination. It wasn't that huge of a hit as the Red Velvet Cupcakes I made, but like I said, its an acquired taste. So those who liked chocolate peppermint loved them. Hubby and I did.

Cake
2 cups all purpose flour
2 cups sugar
3/4 cup cocoa
2 tsp. baking soda
1 tsp. baking powder
1/2 tsp. salt
2 eggs
1 cup brewed coffee, chilled
1 cup milk
1/2 cup vegetable oil
2 tsp. vinegar

1) Preheat oven to 350 deg F. Line muffin pans with muffin cups.

2) In a large bowl, combine flour, sugar, cocoa, baking powder, baking soda, and salt. Make a well in the center and add eggs, coffee, milk, vegetable oil, and vinegar. Mix until smooth (batter will be thin). Evenly distribute batter in muffin cups. Bake for 22 minutes, until toothpick inserted comes out clean. Completely cool before frosting.


Mint Swiss Meringue Buttercream frosting
4 egg whites
1 1/4 cup sugar
1 cup (2 sticks) unsalted butter at room temperature
2 tsp. peppermint extract
1/2 tsp. vanilla extract

1) Place egg whites and sugar in a double boiler pan and whisk until incorporated. Cook over simmering water, whisking constantly until sugar has dissolved and mixture is warm (approximately 160 deg F). Remove from heat.

2) Beat egg white mixture on high until it forms stiff peaks, about 8 minutes.

3) Turn mixture to medium-low and add butter several tablespoons at a time, beating well after each addition.

4) Reduce speed to low and add peppermint extract and vanilla extract. Beat for 2 minutes.

(note: if the frosting is still runny or soupy by the end of the preparation, refrigerate frosting for 30 minutes to 1 hour to stiffen the frosting so that it is easily spreadable).

Wednesday, December 22, 2010

Red Velvet Cupcakes


2 more days until Christmas! Yipee!!!

Christmas is my FAVORITE holiday. Spending time with family, gift-giving, eating, and being merry. That's what Christmas is all about. With our family, Christmas is a two-day affair. Christmas Eve, or Noche Buena, is the eve when we await the arrival of Christ. So its a huge celebration at my parents's house with lots of food and opening presents. Christmas day is spent at our house with my in-laws and we do it all over again with alot more food.

With that said, preparations have to start early. This year I decided to make a few desserts, one with this recipe from Beantown Baker for Red Velvet Cupcakes. I have another Red Velvet Cake recipe that I usually turn to, but realized, after trying other Red Velvet Cakes or cupcakes, that mine seemed a bit dry. I did make a batch of my original Red Velvet cake recipe to make Bon-Bons as well.

The first batch I made of this recipe today came out dry and somewhat chewy. So I trashed a whole batch. What a disaster. Luckily I had enough time and ingredients to make another batch. Then I realized that I had used regular all-purpose flour in the first batch instead of the cake flour it called for. So I made the 2nd batch correctly and it came out so perfect and so moist. I think I may have found a new red velvet cake recipe.

Cake
2 1/2 cups cake flour
1 1/2 cups sugar
1 tsp. baking soda
1 Tbsp. cocoa powder
1 tsp. salt
2 eggs
1 1/2 cups vegetable oil
1 cup buttermilk
2 Tbsp. (1 oz bottle) red food coloring
1 tsp. vanilla
1 tsp. white distilled vinegar

1) Preheat oven to 350 deg F. Line muffin pans with muffin cups.

2) Sift together flour, sugar, baking soda, cocoa, and salt into a medium bowl. Beat eggs, oil, buttermilk, food coloring, vanilla, and vinegar in a large bowl with an electric mixer until well combined.

3)Add dry ingredients to wet ingredients and beat until smooth, about 2 minutes. Bake for 25-30 minutes until toothpick inserted comes out clean. Frost with Brown Sugar Cream Cheese frosting (recipe below)


Brown Sugar Cream Cheese frosting
1 1/2 cups butter, softened
8 oz cream cheese, softened
1/4 cup light brown sugar, packed
1 tsp. vanilla extract
pinch of salt
4-6 cups powdered sugar
2-4 Tbsp. milk, depending on consistency

1) Cream the cream cheese with an electric mixer for about 1 minute. Add butter and beat for 1-2 minutes, until well incorporated.

2) Add brown sugar, salt, and vanilla extract and beat until well incorporated.

3) Slowly add 2 cups of powdered sugar and beat well. Continue adding powdered sugar and alternating with the milk until desired consistency.

Tuesday, December 21, 2010

Lomi Lomi Salmon


With the weather being so dark and gloomy lately, it sometimes makes me miss the islands. I once saw a Food Network chef make some Lomi Lomi Salmon one day, and it inspired me to try to make it too. I was at Costco the other day and found some salmon and thought now was the time to try to make this delicacy often found at all Hawaiian luaus and as a side dish to many Hawaiian meals.

"Lomi Lomi" means to massage. This is a 2-step recipe that requires you to massage fresh salmon with salt and marinate it overnight. But if you don't have the luxury of doing it overnight, you can probably use some smoked salmon. I used Hawaiian salt in this recipe, but you can probably use regular table salt, as Hawaiian salt is quite pungent. Otherwise this dish came out pretty good. And very salty. But that's how most Hawaiian dishes are like. This won hubby's approval.

1 lb. fresh salmon
1/4 - 1/2 cup Hawaiian salt (or sea salt)
6 tomatoes, diced
1 medium onion, finely chopped
1/2 cup chopped green onions
Hawaiian salt to taste

1) Massage salt all over the salmon. Place on a flat tray, cover, and refrigerate overnight.

2) Rinse salmon and soak for at least an hour, changing the water several times.

3) Shred salmon with your hands. Add tomatoes, onions and more salt to taste. Massage ingredients with your hands until ingredients are broken up and thoroughly mixed. Chill before serving.

Monday, December 20, 2010

Herbed Turkey Meatballs with Cranberry Sauce


I came across this recipe from Annie's Eats and it got me missing Thanksgiving. With Christmas Day fast approaching, I'm starting to feel a little bummed that the holidays would soon be over. So I decided to make this today to somehow take me back to a month ago, Thanksgiving. Because after today, I'll be starting my Christmas preparations.

This dish gave me all the flavors of Thanksgiving, without the hassle and stress of preparing a full Thanksgiving meal. This will definitely be my go-to meal when I crave a Thanksgiving meal.

1 Tbsp. butter
1/3 cup onions, finely chopped
1/3 cup celery, finely chopped
1 lb. ground turkey
1 cup breadcrumbs
1 large egg
2 tsp. minced thyme
2 tsp. fresh parsley
1/2 tsp. minced rosemary
1/4 tsp. dried oregano
1/2 tsp. poultry seasoning
1/2 tsp. salt
1/4 tsp. black pepper
cranberry sauce

1) Preheat oven to 425 deg F and lightly grease a baking sheet or line with parchment paper.

2) Melt butter in a small skillet over medium-high heat. Add onion and celery and cook just until softened, about 4-5 minutes. Remove from heat and set aside to cool slightly.

3) In a large mixing bowl, mix together celery/onion mixture with the remaining ingredients (except cranberry sauce) until well combined. Form the mixture into evenly sized balls, about 1 1/2 inches in diameter. Place meatballs, evenly spaced, on prepared baking sheet. Bake for 10-15 minutes until thoroughly cooked. Serve warm with Cranberry Sauce and mashed potatoes.

Sunday, December 19, 2010

Broccoli Cheddar Soup


Its the last weekend before Christmas and its been raining for the past 3 days. We had planned a trip to Disneyland and the rain has, for lack of a better word, dampened our plans. So we stayed local and have kept busy by attending one of my nephew's birthday party and did our last-minute Christmas shopping. I'm pooped, its rainy and cold, and I wanted to have something to warm me up inside.

Last week, our office had a holiday luncheon at BJ's Brewery. I had a half-sandwich and a bowl of Broccoli Cheddar soup. Yummy. I have large bags of broccoli and shredded cheese that I bought from Costco that I could use, so I searched for a good recipe for Broccoli Cheddar soup and found this recipe from CD Kitchen. I've never tried anything from Panera Bread, but this is a copycat recipe of their Broccoli Cheese soup. This was a yummy comfort food that I'll definitely be making again. Its a great way to have your vegetables for the day.

1 Tbsp. butter
1/2 of a medium onion, chopped
1/4 cup melted butter
1/4 all purpose flour
2 cups half-and-half (I used 1 cup milk and 1 cup cream)
2 cups chicken broth
1/2 lb. fresh broccoli
1 cup julienned carrots
salt and pepper to taste
1/4 tsp. nutmeg
8 oz shredded cheddar cheese

1) Melt 1 Tbsp. butter in a stockpot. Saute chopped onions for about 2 minutes. Set aside.

2) In the same pot, add melted butter. Whisk in flour to make a roux and cook for about 3 minutes, whisking constantly. Slowly add half-and-half. Add chicken broth. Simmer on medium-low for 20 minutes, whisking constantly.

3) Add onions, broccoli and carrots. Simmer on low heat for about 20 minutes, until the vegetables are tender. Season with salt and pepper.

4) Place mixture in a food processor or blender and puree (or you can use an immersion blender). Return mixture to the pot to heat. Add cheese and continue to cook on low heat until cheese has melted. Add nutmeg. Remove from heat and serve topped with more shredded cheese or croutons.


Saturday, December 18, 2010

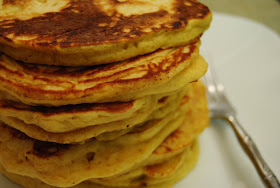
Pumpkin Spice Pancakes


Its a chilly and rainy Saturday morning and we decided to stay in. And whenever we stay in, I like to make a nice breakfast for us.

I still had some pumpkin puree in the freezer that I wanted to use up. And then one day, I came across this recipe from Annie's Eats that I had been saving up and I thought today was a good day to try it out. What a great recipe this was. It very tasty and my daughter loved it. We served this with whipped topping, or pancake syrup, or cinnamon sugar. My daughter liked dipping her pancakes in the whipped topping the best. This is another great way to sneak in something healthy in my daughter's food.

1 1/4 cup all purpose flour
2 Tbsp. brown sugar
2 tsp. baking powder
1/4 tsp. salt
3/4 tsp. ground cinnamon
1/4 tsp. ground nutmeg
dash of ground ginger
dash of ground cloves
1 cup milk
1/2 cup pumpkin puree
1 large egg
2 Tbsp. vegetable oil or melted butter

1) In a medium mixing bowl, combine flour, brown sugar, baking powder, salt and all the spices. Stir to combine.

2) In a small bowl, combine milk, pumpkin puree, egg and oil/butter. Add mixture to dry ingredients and whisk until well incorporated (note: the batter will be a little lumpy).

3) Heat a greased skillet or pan. Pour batter on skillet and cook on both sides until golden brown. Serve warm with maple/pancake syrup, whipped topping, or cinnamon sugar.


Monday, December 13, 2010

Bobby Flay's Macaroni & Cheese Carbonara


I first saw this dish on the show Throwdown with Bobby Flay on the Food Network. It was a throw down to Macaroni and Cheese, and this was Bobby Flay's twist on the old classic. I love Pasta Carbonara. I have my own version of Carbonara that I make often when I want to cook a quick pasta. But since my daughter loves Mac & Cheese and I love Carbonara, this was a "must-make" recipe for me.

The original recipe called for all kinds of expensive cheeses such as Fontina and Asiago. Not readily accessible to me right now. I do, however, have a huge bag of mixed shredded cheese I bought from Costco that I always have on hand. The recipe also called for pancetta, but I used regular bacon instead and it came out awesome. Its a great way to spruce up regular macaroni and cheese.

butter to grease baking dish
1 Tbsp. olive oil
4-5 slices of bacon, diced
4 cloves garlic, finely chopped
3 Tbsp. all purpose flour
5 cups warm milk
4 large egg yolks, slightly whisked
1 tsp. dry thyme leaves
1/2 tsp. cayenne pepper
6 cups of shredded cheese (plus more for topping)
1/2 cup shredded Parmesan cheese (plus more for topping)
salt and pepper
1 lb. small pasta shells (such as elbow macaroni), cooked just to al dente
1/2 cup coarsely chopped parsley

1) Preheat oven to 375 deg F. Butter bottom and sides of a 10 x 10 baking dish. Set aside.

2) Heat oil in a large saute pan over medium heat. Add bacon and cook until golden brown on all sides. Remove from oil and place on a plate lined with paper towel to drain oil.

3) Add garlic to oil and cook just before it turns golden brown. Whisk in flour and cook for 1-2 minutes. Whisk in warm milk and raise heat to high, whisking constantly until it thickens, about 5 minutes.

4) Temper eggs by adding about 1/4 cup of the milk mixture with the eggs and whisk. Whisk egg mixture into remaining milk mixture. Continue whisking for 1-2 minutes. Remove from heat. Whisk in thyme leaves, cayenne and cheeses until melted. Season with salt and pepper. If the mixture is too thick, add more warm milk, 1/4 cup at a time.

5) In a large bowl, combine cooked pasta, cheese sauce, cooked bacon, and parsley. Transfer to prepared baking dish. Top with a mixture of cheeses. Bake for 12-15 minutes, until mixture is heated through and the top is a light golden brown.


Saturday, December 11, 2010

Early Christmas gift - a new kitchen tool


.....well, it isn't really a new kitchen tool, but its going to definitely be used in the kitchen when I photograph all my yummy dishes with it.

Hubby and I finally succumbed to the masses and bought a D-SLR camera as a Christmas present for each other this year. I've been dying to get one since forever (well, at least since my daughter was born and I started this blog 2 years ago). I look at so many blogs everyday that have photographs using a SLR camera and am always amazed at how alive they look. They definitely make a food photo look even more delicious.

This will definitely help me showcase my food even better. Because, honestly, I always struggle with the lighting in my house. I always try to find creative ways to give the dish better lighting. Especially since most of my cooking is done after work when I cook dinner and there is no longer any natural light from the sun. This will also be useful when taking our family portraits or shooting photographs of my daughter. We normally have my sister (who has a Nikon D90) be our family photographer. She has all the bells and whistles with her camera: Fisheye lens, heavy duty flash, etc. But its not always convenient for her to take time out of her busy schedule to photograph us.

This camera is a very basic SLR camera. Its not a D90 by any means. But its a good camera for beginners and amateurs such as myself. Hubby and I are still testing it out and trying to figure out what kinds of tricks it can do. One things for sure, though - we're definitely very excited to have this new addition to our tech gadgets and are looking forward to viewing the outcome.

Monday, December 6, 2010

White Chocolate Cranberry Orange Cookies


The holiday season is in full swing at our house. The Christmas tree is up, presents are under our tree, lights and lawn decorations are on our house. I LOVE CHRISTMAS!

To keep with the holiday spirit, I decided to make these cookies from the Betty Crocker website. The recipe called for fresh or frozen cranberries, but I decided to use dried cranberries instead and it came out really well. These were so delicious and very festive. The tartness of the cranberries and the sweetness of the white chocolate chips blend together so well. I think I may have found a new favorite cookie.

1/4 cup unsalted butter, softened
1/2 cup sugar
1/2 cup packed brown sugar
grated zest of 1 orange
1 egg
2 tsp. vanilla extract
1 1/2 cups all purpose flour
1/2 tsp. baking powder
1/2 tsp. baking soda
1/4 tsp. salt
1 cup cranberries (fresh, frozen, or dried)
1/2 cup white chocolate chips

1) Preheat oven to 350 deg F. Grease cookie sheets or line with parchment paper.

2) In a small bowl, sift together flour, baking powder, baking soda and salt. Set aside.

3) In a large bowl, beat together butter, sugar, brown sugar, and orange zest on medium speed until well blended. (The mixture will have a consistency of wet sand). Add egg and vanilla and beat until smooth.

4) Add flour mixture into egg mixture and stir by hand until almost combined. Add cranberries and white chocolate chips and stir just until blended.

5) Drop spoonfuls of dough, 1 inch apart, on prepared cookie sheet. Bake for 12-14 minutes until light golden and set around the edges but still soft in he middle. Cool on the cookie sheet for 1-2 minutes. Transfer to cooling rack to finish cooling.