Sunday, September 26, 2010

Jap Chae (Korean Glass Noodles)


I love eating Korean BBQ. But my family doesn't always like going to Korean BBQ restaurants because they 1) don't always like waiting for their food to cook, and 2) they don't like leaving the restaurant smelling like their meal. So I've learned to bring Korean BBQ home by making my own Korean dishes. Other than the actual BBQ itself, I also love eating the noodles they serve the food with. I never knew what the noodle dish was called but I've been dying to try to make it at home. So I did a search online and found this recipe. Jap Chae, so that's what its called!

Its my mother-in-law's birthday today and we're hosting the lunch at our house. Everyone is bringing a dish, and I decided to make my Korean BBQ Short Ribs and I thought making Jap Chae would go perfectly with it. This noodle dish tastes exactly like what they serve at the restaurants and it was so good! And easy too. Everyone liked it, even our nephew's girlfriend who happens to be Korean. Its a really light dish. I'm definitely going to make this again.

1/2 lb. dried Korean sweet potato noodle
2 1/2 tsp. sesame oil
1 Tbsp. cooking oil
3/4 cup thinly sliced onions
2 medium carrots, julienned
2 cloves garlic, minced
3 stalks green onions, cut into 1" pieces
1/2 cup sliced mushooms (shitaake or wood ear)
1/2 lb. spinach, washed and drained
2 Tbsp. soy sauce
2 tsp. sugar
1 Tbsp. sesame seeds

1) Cook noodles in a pot of boiling water for 5 minute. Drain under running water. Toss with 1 tsp. sesame oil to prevent from sticking. Cut noodles to smaller pieces with kitchen sheers. Set aside.

2) In a small bowl, mix soy sauce and sugar together. Set aside.

3) Heat vegetable oil in a hot wok or large skillet. Fry onions and carrots until softened, about a minute. Add garlic, green onions and mushrooms and cook for another minute. Add spinach, soy sauce mixture and noodles. Sautee for 2-3 minutes until noodles have cooked through. Turn of the heat and toss in sesame seeds and the remaining 1 1/2 tsp. sesame oil. Serve warm or cold.

Saturday, September 25, 2010

Guava Jelly


Hubby and I always love taking back some Guava Jelly from Hawaii. We haven't been to a Hawaii in a while and I MISS not only Hawaii but Guava Jelly. Our neighbor has a guava tree and when the guavas are really ripe, our backyard smells of sweet guava that reminds me of guava jelly. I've always been tempted to just climb over and pick some sweet guava so I can make guava jellym but never get the nerve to do it. Well, yesterday, one of my co workers brought some guavas from her tree. Score! I can now finally make some. So off I went to look for a guava jelly recipe and found this one. I got home from a party today to the smell of guava in my house. The guavas I got yesterday were starting to over ripen, so I figured now was finally the time to make it. It came out pretty good. The recipe didn't really call for exact measurements, so I've modified the recipe a bit with my measurements. This'll definitely tie me over until our next trip to Hawaii.


Wednesday, September 22, 2010

Oven Baked Zucchini Chips


This recipe popped up on my reader today from Telly's Tasty Tidbits. I had some leftover zucchinis from my diet last week that I wanted to use up, so this recipe came up at the right time. I LOVE zucchinis and I'm so glad I made these because they were so yummy! My daughter loved these too. This is a great way to sneak in some veggies for her because she hates veggies. Thank you so much for this recipe! I'll definitely be making this again.

1/4 cup dry breadcrumbs
1/4 grated parmesan cheese (I used shredded parmesan on this one)
1/4 tsp. seasoned salt
1/4 tsp. garlic powder
a pinch of black pepper
2 Tbsp. water
1 egg, beaten
2 small zucchinis, thinly sliced
cooking spray

1) Preheat oven to 425 deg. F. Grease 2 cookie sheets with cooking spray. Set aside.

2) In a medium bowl, combine breadcrumbs, parmesan cheese, seasoned salt, garlic powder and black pepper.

3) In another bowl, whisk together egg and water. Dip zucchini slices in egg mixture and dredge in the breadcrumb mixture. In a single layer, place zucchini slices on prepared cookie sheets. Bake for 20 minutes or until browned and crisp.

Tuesday, September 21, 2010

Mango Kulfi (Indian Mango Ice Cream)


I love any kind of mango ice cream. Even Indian Mango Ice Cream (aka Mango Kulfi). My first taste of Mango Kulfi was years ago when I was first introduced to Indian food. I haven't had it in a while, and was craving it. So I decided to search for a recipe I can use and found this one.


2 cups heavy whipping cream
chopped pistachios, for garnish

1) In a large bowl, combine condensed milk and cardamom. Set aside.

2) In another bowl, beat whipping cream until it forms soft peaks. Gently fold whipped cream into condensed milk, making sure not to over-mix. Gently fold in mango puree until well incorporated.

You can now either freeze mixture in a container as-is, or continue to run it through an ice cream maker according to the manufacturer's instructions. Freeze in freezer for at least 6 hours before serving. Top with chopped pistachios for garnish.

Monday, September 20, 2010

Sea Scallops with Saffron Aoli


Happy 7th anniversary to me and hubby. As I've said on my posts yesterday, hubby is out at work and school the whole day. So we celebrated our anniversary by going out to lunch yesterday. Today, I wanted to have a nice dinner waiting for him when he got home.


Green Goddess Rice


1 1/2 cup basmati rice (I used long grain white rice)
salt
1 small avocado, peeled and seeded
1 cup fresh basil
juice of 1 lemon
3 Tbsp. extra virgin olive oil
1/4 cup water
black pepper

1) In a medium sauce pan, bring rice, pinch of salt and 5 cups of water to a boil over medium heat. Reduce heat to a gentle simmer, stir, cover and cook until liquid is absorbed, about 18 minutes. Remove from heat and let stand, covered for 10 minutes.

2) Meanwhile, put avocado, basil, lemon juice, olive oil and water in the blender and puree. Season with salt and pepper. Add more water and puree until the mixture reaches the consistency of sour cream.

3) Fluff rice with a fork and gently fold in green dressing into warm rice. Taste and add more salt and pepper if necessary. Serve immediately.


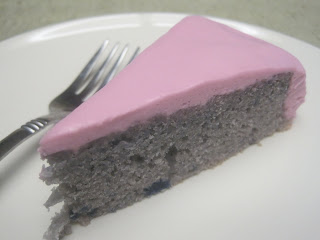
Ube Cake


I asked hubby what kind of cake he wanted me to make. I had him choose from either a Custard Cake or Ube Cake. Both of which are new recipes that I found and that I'll be trying for the first time. He chose ube cake.


Its suppose to be a 2-layer cake, but because I wasn't too happy with the frosting, I decided to use 1 layer for this particular frosting and the other layer will be used later when I try a different frosting. Maybe a swiss meringue type of frosting. We'll see. The flavors of this cake was quite good. The consistency wasn't as good. Hubby enjoyed it otherwise

2 1/2 cups cake flour
3 tsp. baking powder
1 tsp. salt
1 cup grated ube (purple yam)
3/4 cup milk
1 tsp. vanilla extract
1/2 cup light corn syrup
7 egg yolks, lightly beaten
1/2 cup vegetable oil
7 egg whites
1 tsp. cream of tartar
1 cup sugar
6 drops red food coloring
6 drops blue food coloring

1 cup sweetened condensed milk
2 sticks butter, softened
purple food coloring

1) Preheat oven to 325 deg F. Line 2 - 9 inch pans with parchment/wax paper.

2) In a medium bowl, mix together flour, baking powder and salt. Set aside

3) In a large bowl, combine milk and 1 tsp. vanilla. Add ube and blend until smooth. Blend in corn syrup, egg yolks, and oil. Beat in flour mixture until smooth. Set aside.

4) In a separate large mixing bowl, beat egg whites with cream of tartar until it starts to foam. Gradually add sugar and red & blue food coloring, continuing to beat until stiff peaks form. Fold in 1/3 egg whites into ube batter. Then fold in the remaining egg whites and continue folding until no streaks remain. Pour batter into prepared pans.

5) Bake for 35-45 minutes until the center of the cake bounces back when lightly touched. Cool completely before frosting.

6) To make the frosting, beat butter until it becomes light in color and fluffy. Beat in condensed milk and purple food coloring and blend until smooth. Continue adding food coloring until you reach the desired shade. If the frosting is too soft or wet, refrigerate until it hardens enough to frost the cake.

Sunday, September 19, 2010

Chicken Enchilada Dip Roll-ups


Its the eve of our 7th anniversary. Unfortunately, hubby has to be in class all evening tomorrow. Which means I'll be without him for our anniversary. I plan on waiting up and having a nice dinner set out for him when he gets home. But being at work and school all day, I'm sure he'll be very hungry before coming home. I normally pack him a sandwich on these nights when he's out all day and evening. But it being our anniversary, I wanted to send him off to school with something different.

I've bookmarked this recipe for a while from Sing for your Supper... which I thought hubby would really appreciate. Hubby and I love enchiladas and I think this is an awesome twist to one of our favorite Mexican dishes. This was originally a dip recipe, but it can be used to spread on a tortilla and then rolled-up to make a nice appetizer.

2 packages (8 oz) cream cheese, softened
1 1/3 cup shredded Mexican cheese blend
1 tsp. minced garlic or garlic powder
1 Tbsp. chili powder
1 tsp. cumin
cayenne pepper to taste
salt taste
3 boneless, skinless chicken, chopped or shredded
1 bunch cilantro, chopped
4 green onions, chopped
10 oz can diced tomato with green chilies

1) Mix cheeses together until well blended. Add remaining ingredients and mix well. Cover and refrigerate for at least 1 hour.

2) Spread dip on a flour tortilla and roll. Cut into 1-2 inch thickness. Serve.

Pre-Anniversary


Its the day before our 7th Anniversary. Unfortunately for us, hubby has to be at work and school the whole day tomorrow. So we decided to celebrate our special day a day in advance.

Seven years ago, hubby and I honeymooned in Hawaii. We absolutely LOVE Hawaii. Before our daughter came, we used to visit Hawaii every year. We plan to take her there and go back to our tradition of yearly trips to the islands. But for now, all we have are memories from photos and videos of our trips there.

Today, hubby surprised me by taking me to a Hawaiian restaurant Back Home in Lahaina. I always feel nostalgic whenever we eat Hawaiian food. This place did that for me. Walking in the restaurant, you already start to feel the "aloha," when you are greeted by Hawaiian music and friendly staff.

The menu is very much Hawaiian. We started our meal with the Hawaiian nachos.


I ordered the Kalua pork with macaroni salad and steamed rice. A common plate lunch.


Another common plate lunch is the Loco-Moco, also with macaroni salad and steamed rice. Its a hamburger patty topped with fried eggs and brown gravy. This is hubby's favorite, so its what he ordered.


We each ordered a side of Lomi-Lomi Salmon, often found at luaus in Hawaii. Yummy!


For my daughter, we ordered her Saimin. A ramen noodle soup which she absolutely loved and ate up.


Our overall experience here was a very pleasant one. The food was delicious. The only thing missing was the poi. lol. But I can do without that. We'll definitely go back here again when we start to miss the islands.


Saturday, September 18, 2010

Malasadas II (Leonard's bakery version)


We've attempted to recreate the delicious Malasadas that hubby made last year but they somehow don't turn out the same as when hubby originally made them. Working with yeast is very tricky. So whenever we tried to make them again, they didn't rise well and they tasted very yeast-y.

My brother told me he found a recipe on the Food network that supposedly is a recipe from Leonard's bakery - a bakery in Hawaii that is famous for its malasadas. So I decided to try to make it for breakfast today and they came out delicious. And it didn't have a yeast-y flavor at all. I think hubby thinks this was a better recipe than his. Sorry boo :(

The tricky part of this recipe is how its cooked. You have to constantly monitor the temperature of the oil, otherwise you may end up with a charcoal looking ball with its center still uncooked.

2 tsp. dry active yeast
1/4 cup warm water
1 Tbsp. plus 1 1/3 cup sugar
2/3 cup milk
1 tsp. vanilla extract
4 eggs
1/2 cup unsalted butter, melted
4 cups all purpose flour
1/2 tsp. salt
2 tsp. nutmeg
vegetable oil for frying
cinnamon-sugar

1) In a medium bowl, combine yeast, warm water and 1 tablespoon sugar. Mix until yeast dissolves and set aside for 5 minutes. Stir in milk, vanilla, eggs and butter. Set aside.

2) In a large bowl, mix flour, 1 1/3 cup sugar, salt and nutmeg. Make a well in the center of the flour mixture. Pour yeast mixture into the center of the well and mix to form a soft, smooth dough. Cover dough with a clean towel and set aside in a warm place until dough doubles in size. (Note: this may take anywhere from 1-3 hours, depending on how warm the air is. You need to wait to make sure the dough rises to double its size.)

3) Once the dough has risen, punch the dough down and set aside. Heat 2 inches of oil in a high-sided pot to 325 deg. F. Using an ice cream scoop, scoop a golf-sized ball into the hot oil. Make sure to work with small batches and fry the dough until the are uniformly golden brown, about 3-5 minutes on each side. (Note: its very important to monitor and maintain the temperature of the oil. Too hot of an oil will cause the malasadas to burn on the outside while being undercooked on the inside).

Drain malasadas on a paper towel then roll them in the cinnamon sugar. Serve warm.

Thursday, September 16, 2010

Fig and Prosciutto Pizza


Fig and Prosciutto???? Sounds pretty wild, huh? I first heard of this flavor combination on the food network and I was intrigued. I've always loved the sweet and savory combination of flavor. So I thought why not give it a try. I stopped by a local produce store during my lunch break today and they had the figs on sale. What perfect timing. I used goat cheese on this pizza, but I think I'll use brie next time. Its much milder than than the goat cheese, which I think overpowered the flavors of fig and prosciutto. Otherwise, this pizza was quite refreshing and really simple to make. Especially for an evening like today where I didn't really feel like cooking anything.

pre-made pizza dough
figs, sliced
prosciutto, shredded into small pieces
goat cheese (or any other mild cheese like brie, or even mozzarella)

1) Heat grill or oven to 400 degrees. Roll out dough to desired thickness. (**skip this part if using an oven) Place dough directly on grill. Heat for 2-3 minutes, until the dough begins to harden. Remove from heat.

2) Place toppings on dough (if pre-cooked on grill, place toppings on the cooked side) and return to heat until cheese have all melted. Serve.

Monday, September 13, 2010

Crockpot Sloppy Joe's


Hubby would often tell me that his favorite food as a kid that his mom would make was sloppy joe's. I asked him if she had a recipe and he said she used the can mix. Well, I was sifting through my Crockpot cookbook in search of what to cook for dinner and found this one. It was definitely easy to make. I cut the recipe to a quarter because the original recipe served 20-25. Too much for a family of 3. So I've adjusted the recipe. Too bad hubby is at school tonight because this was so good. I have to admit, I haven't had sloppy joe's in ages. Probably not since my elementary school days, eating the cafeteria sloppy joe's. I don't remember sloppy joe's being this good. Hubby will have to wait until lunch tomorrow to try this one out.

1 lb. ground beef (I used ground turkey)
1/4 cup chopped onion
1/4 cup chopped green bell pepper
1 (8 oz) can tomato sauce
1/2 (10.74 oz) can condensed tomato soup
1/4 cup brown sugar
1 1/2 Tbsp. ketchup
3/4 Tbsp. Worcestershire sauce
1 Tbsp. mustard
1/2 tsp. chili powder
1/4 tsp. garlic powder
toasted hamburger buns

1) Brown meat in a large skillet over medium-high heat, stirring to break up meat. Drain fat and discard.

2) Add onion and bell pepper. Cook 5-10 minutes, stirring frequently, or until onion is translucent and mixture is fragrant.

3) Transfer meat mixture to crockpot. Add remaining ingredients, except buns. Stir until well blended. Cook on low for 4 hours. Serve on buns.


Blueberry Crumble Cake


So you guessed it....hubby and I gave up the diet. We lasted a whole week. I lost a total of 9 pounds and hubby lost 8 pounds. And we feel much slimmer. Our clothes are much looser. Not bad for going on a week-long diet. We figured we were happy with what we've lost. And we miss flavor so much. So we stopped the diet. We'll definitely still strive to maintain our current weight by watching our caloric intake.

Yeah, you're probably thinking how is this new recipe going to help with that. Well, it won't. lol. But we have so much ingredients leftover from the diet that I had to do something with them. I had bought a package of blueberries that I've been dying to use for this recipe. I found this recipe on Lemons & Love during my week-long diet, hoping to make it one day. I'm so glad that the day finally came. This was originally a recipe from Ina Garten and it was so yummy. Perfect with a nice cup of tea. I'll be sure to only eat this in small portions and share the rest with others. But its so hard to resist. Even my daughter loved it.


Wednesday, September 8, 2010

Fat Flush diet, Day 4 - Friendly Italian Wedding Soup


To date, I have lost a total of 6 pounds and hubby lost 7 pounds on this diet. I knew I was going to have to pay for the cheating I did yesterday because I only lost 1 pound since yesterday. But we're still progressing very well. My original goal was to lose anywhere between 5-8 pounds. But with the way things are going, my new goal is to weigh the same amount as I did right before I got married. I want to be able to fit in my engagement dress again. Wishful thinking? Maybe. But a goal is always good to have.

Tonight's dinner looked good on paper. It also looked really good once the dish was cooked. Hubby got really excited when he saw the bowl of soup because it actually looked edible. But I told him not to let the look deceive him. He should know better after the 4 days on this diet. The original recipe didn't call for tomatoes, but I decided to add some for color, and hopefully, flavor.

1 lb. ground turkey or lean ground beef
2 Tbsp. minced garlic
1 tsp. chopped parsley
1/4 cup minced onions
4 cups low sodium chicken broth
1 medium carrot, chopped
1 large tomato, chopped
2 cups packed fresh spinach

1) Combine meat, garlic, parsley, and onions in a medium bowl. Roll into 1 inch balls. In a sautee pan, cook meatballs on medium heat until browned on all sides. Set aside.

2) In a stock pot, heat broth, carrots and tomato until it begins to boil, about 15 minutes. Add spinach and cooked meatballs. Continue to simmer for another 5 minutes. Serves 4.


Tuesday, September 7, 2010

Fat Flush diet, Day 3 - Cod with spinach


Its day 3 of the Fat Flush diet and so far, I've lost a total of 5 pounds! I now weigh less than what I weighed before I was pregnant with my daughter. I can see it around my belly and love-handle areas too. And hubby lost 4 pounds so far. I'm actually impressed with what we've accomplished so far. Though I have to admit that I did cheat today, eating a few pieces of my daughter's biscuits/crackers. I couldn't help it. I was getting hunger pains, even after eating a whole nectarine. I hope that doesn't set me back too much.

For dinner tonight, I decided to make cod. One of my favorite white fishes. I usually love eating cod, but tonight, as expected, I was quite disappointed with the flavor. I thought that the fish would flavor itself, but I was wrong on this one. I'll still love my cod, but not prepared this way. I'll make this again during these 2 weeks though. I served this with a side of spinach cooked in low-sodium vegetable broth and minced garlic.

4 ounces cod (or any white fish)
2 Tbsp. low sodium vegetable broth
1/2 Tbsp. fresh parsley, chopped
1/2 tsp. minced garlic

1) Combine broth, parsley and garlic in a small bowl. Brush on both sides of the fish. Cook in a pan on medium heat until done.

Monday, September 6, 2010

Fat Flush diet, Day 2 - Salmon with Lemon, Dill and garlic


Its day 2 of the Fat Flush diet. So far so good. I've lost 2 pounds since starting this yesterday. I know I shouldn't be weighing myself everyday, because the book says everyone loses weight differently. But I can't help it. I want to see progress. I think its more bloat that I lost rather than actual fat though. But any weight loss is good for me.

For lunch today, I decided to have fish. I found a fish recipe on the book that I wanted to use. I think having seafood has a lot more flavor because it has its natural saltiness. So this wasn't as bland as the other recipes I've tried. I served this with a side of steamed broccoli tossed with flaxseed oil

4 ounces salmon
splash of vegetable broth
1 Tbsp. lemon juice
1 clove garlic, minced
1 Tbsp. fresh dill, minced

1) In a small bowl, combine broth, lemon juice, garlic and dill. Brush on both sides of the salmon. Cook on a pan on medium meat while basting it once with the remaining liquid mixture until done.

Fat Flush diet - Yummy Meatloaf


Don't let the name fool you. This is far from being "yummy." It thought it was, so I figured this should be our dinner for tonight. There really isn't much to describe about this dish, because all the recipes on this diet is bland. You'll hear that a lot from me in the next 2 weeks. I served this with a side of steamed asparagus tossed in garlic and low-sodium vegetable broth.

4 ounces ground turkey
1/4 cup chopped spinach
1/2 tsp. chopped parsley
1/4 cup chopped onion
1 garlic clove, minced
1/8 tsp. cayenne pepper

1) Preheat oven to 400 deg. F.

2) Combine all ingredients in a medium bowl. Place in a mini-loaf pan or form into a mini loaf and place in a cookie sheet. Bake for 30 minutes.

Makes 4 servings.

Sunday, September 5, 2010

The Fat Flush Diet


So hubby and I started this diet today called the Fat Flush Plan by Ann Louise Gittleman. Its basically the flushing of toxins from the body with eating lean meats, lots of green vegetables, fruits, drinking cranberry water, adding flaxseed meal and flaxseed oil, and no flavoring......which will all eventually help to lose weight in the next 2 weeks.

I ordered the book last week and studied the plan for a couple of days. Then this weekend, we bought all the foods and supplements we needed. This is not a cheap diet, to say the least. We spent $55 on supplements alone (ground flaxseed, flaxseed oil, sugar substitutes, dietary supplements, protein powder). Then we headed off to Costco to buy all the foods for the meal. That's another $100+. I sure hope this diet works.

The book gives a sample meal plan for the week, which includes various recipes for each meal. Today we started with an egg scramble with spinach and parsley. For lunch I made a beef stir fry with bok choy, sprouts, and mushrooms. For dinner, I sauteed some shrimp with garlic. All recipes looked great on paper, but tasted just as I expected.....bland. I didn't get a chance to photograph today's meals. I was too busy trying to figure out what I needed to prepare. I think I'm starting to get the hang of it, so I think tomorrow's preparations will be better.

Its hard having to give up all the flavors I'm used to. But I keep telling myself "Its only for 2 weeks!" Friends from work have tried this diet and swear by it. So I'm hoping I'll be as successful as they had been. We'll see. Today is day 1. Will I be able to make it to Day 14??


Saturday, September 4, 2010

Baked French Toast


Today will be my last day of food indulgence, because starting tomorrow, Hubby and will I be on a 2-week long diet. It'll be a strict diet of liquid, veggies, fruits, supplements and no carbs, salt, sugar, or flavor! So today, hubby and I are on "Fat-Saturday" mode (as opposed to Fat Tuesday. lol!). After today, some of the recipes I'll be posting for the next 2 weeks will be diet food. Which is why I chose today to make this recipe I found on allrecipes.com.

I've made Baked French Toast before, but for some reason, I couldn't find that recipe. This came out crunchy, custardy (an oxymoron, I know) and syrupy. But it was quite delicious with the crunch from the top side of the bread, custardy on the inside, and sweet from the syrup. A great way to make ahead for a brunch.

2 Tbsp. corn syrup
1 stick butter
1 cup brown sugar
1 (1 lb.) loaf french bread, sliced (or any hard/dense bread you have)
5 eggs
1 1/2 cup milk
1 tsp. vanilla extract
1/4 tsp. salt

1) In a small saucepan, heat butter, brown sugar and corn syrup and simmer until sugar has melted. Pour over a greased 9x13 baking dish or smaller.

2) Layer slices of bread over brown sugar mixture. In a medium bowl, beat together eggs, milk, vanilla extract and salt. Pour egg mixture over bread. Cover dish and refrigerate overnight.

3) The next morning, preheat oven to 350 deg F. Uncover pan and bake for 45 minutes. Dish will be done when you test with a toothpick and the toothpick comes out clean. Serve warm or the French toast will harden. It can be reheated.