Its the day before my daughter's 4th birthday party and hubby and I had the day off to prepare for the festivities tomorrow. But we also wanted to spend the day with our precious baby girl. When I asked her where she wanted to go: Mountasia or The American Girl Place, she didn't think twice and said The American Girl Place. So I thought how much fun it would be for her if we also had lunch at their cafe.
To get to the cafe, we had to go through the store, which was a pretty difficult task when my daughter wanted to check out every piece of item in the store. Once we arrived at the pink and black dollhouse-themed cafe, we were seated. Our daughter's doll was also given a booster seat and tea to join in the meal. If your little didn't have a doll, the cafe has a huge selection of dolls they can lend you during the meal.
The meal begins with each guest having a warm cinnamon bun, followed by a plate of crudites (celery and carrot sticks, and pretzel). Then each guest gets to pick an entree from the menu. Hubby ordered himself a Tic-Tac-Toe Pizza. Isn't it cute?
I ordered myself a Turkey burger.
And of course, the little Princess ordered a plate of buttered pasta.
To wash down the meal, we each had the signature Pink Lemonade. And for dessert, we were each served a pot of chocolate mousse, star-shaped sugar cookie, and a flower-shaped cupcake.
The food was quite pricey for what it was. An average meal. But you can't really put a price on the experience and joy you see from your daughter. That is priceless. I think it was a fun experience for all of us. I think we may have found ourselves a new tradition for her birthdays :)
Friday, April 27, 2012
Tuesday, April 24, 2012
Happy 4th Birthday to my little Princess
I can't believe my daughter is 4 today. I know its cliche, but time did go by so fast as I watched her grow up. I don't think I even remember anything before she was born. But I do remember every moment the day she was born and it was an absolute miracle. She's our miracle and I'm thankful everyday that God has blessed us with our sweet baby girl. She's growing too fast, but she always assures me that she'll always be my baby. I hope she remembers that when she's 16 and we won't allow her to stay out late. lol!
Every year, I usually give myself about 6 months to plan for her birthday. This year is a little different because she's in preschool now, and I have to plan for cake with the kids in her class on top of her birthday party. I wanted to make some cupcakes instead of a whole cake, because it would be easier to distribute among the kids in her class instead of cutting cake. Last week, we asked the school director if it was okay to bring in some cupcakes. She just asked that the cupcakes be the mini size because it would be less messy.
Now that we got the okay, I had the idea of making a pull-apart cake made out of cupcakes in the shape of a butterfly. I decided to make Vanilla Cupcakes because I felt its a neutral and safe cupcake to serve the kids. I made the shape of a butterfly using the cupcakes and placed a small dollop of frosting on the bottom of each cupcake to secure them to the cake board.
Then I placed a mound of frosting on the top and smoothed it out as much as I can.
The coolest part was when I spray painted the color on top of the frosting with a Wilton Color Mist Spray that I found at the craft store. I then outlined the shape of the butterfly with a gel icing and affixed some edible flower candies to decorate the butterfly. I'm actually impressed with myself, because I'm by no means a cake decorator. I struggle with frosting a cupcake, let alone a whole cake.
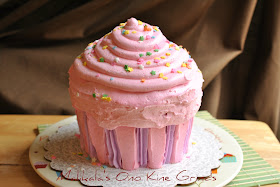
I also wanted to have a cake for her at home to celebrate with my folks, so I decided to buy the giant cupcake mold and make a giant vanilla cupcake.
It didn't turn out as pretty as I had hoped, but it looked okay.
We have a huge party planned for her this weekend. And I can't wait. I hope my daughter can someday appreciate the effort I put into planning her birthdays because she's so very special to me. I love you my little munchkin!
Monday, April 23, 2012
General Tso's Chicken
Honestly, I've never really had General Tso's Chicken before. In fact, I don't think I've ever seen it on the menus at the Chinese restaurants we visit. Even at Panda Express. But I've seen it around the blogosphere and I've actually seen it in the frozen food section at the grocery store. And when it finally came up on my reader from Brown Eyed Baker, I thought it was high time I find out what this dish was all about.
This dish had quite a few steps to follow with the marinade and sauce, to the breading of the chicken. But I'm so glad I gave it a try. I don't have anything to compare this to, but this dish came out really good. Its reminiscent of Orange Chicken because of the breading. I'm definitely making this one again.
Marinade & Sauce
1/2 cup hoisin sauce
1/4 cup white vinegar
3 Tbsp. soy sauce
3 Tbsp. sugar
2 Tbsp. cornstarch
1 1/2 cups water
4 boneless, skinless chicken, cut into 1-inch pieces
1 Tbsp. oil
4 cloves garlic, minced
2 Tbsp. grated fresh ginger
1/2 tsp. red pepper flakes
Coating
3 egg whites
1 1/2 cup cornstarch
1/2 cup all purpose flour
1/2 tsp. baking soda
4 cups oil
1) To make the marinade, whisk together hoisin sauce, vinegar, soy sauce, sugar, cornstarch, and water in a bowl. From this mixture, place 6 tablespoon in a freezer bag and add chicken. Seal and refrigerate for at least 30 minutes. Set aside remaining marinade.
2) While chicken is marinating, heat 1 tablespoon of oil in a large skillet over medium heat until shimmering. Saute garlic, ginger and red pepper flakes until fragrant. Add 2 cups of marinade to the skillet and simmer, whisking constantly, until mixture is dark brown and thickened. Remove from heat, cover, and keep warm.
3) To prepare chicken for coating and frying, whisk egg whites in shallow dish until foamy. Set aside. In another shallow dish, combine cornstarch, flour, baking soda, and remaining marinade. Mix until it resembles coarse meal.
4) Remove chicken from marinade. Pat chicken dry. Place half of the marinaded chicken into the egg whites and toss until well coated. Dredge chicken in cornstarch mixture, pressing to adhere. Transfer coated chicken to a plate and repeat with the remaining chicken.
5) Heat oil in a pan over medium-high heat until it registers 350 deg F. Fry half of the chicken until golden brown, about 3 minutes, turning each piece halfway through cooking. Transfer cooked chicken onto a paper towel-lined plate to drain the oil. Return oil to 350 deg F before frying the next batch. Repeat with the remaining chicken.
6) Warm sauce over medium heat until shimmering. Turn off the heat and add fried chicken pieces. Toss to coat and serve over white rice.
Sunday, April 22, 2012
Chewy Sugar cookies
My daughter's birthday is fast approaching. I cannot believe she'll be 4 soon. boohoo! Anyway, we're planning a party for her next weekend with all kinds of activities. Including an Ice Cream Sandwich Bar. At first, I had the plan of ordering the ice cream sandwiches for the party. So I went to a couple of places that specialized in build-your-own ice cream sandwiches so I can try them out. But I had this crazy idea to do something similar at home using my own home-baked cookies. What a fun idea for all the guests to build their own ice cream sandwiches. I would definitely serve my Big Fat Chewy Chocolate Chip Cookies and Mint Chocolate Chip Cookies. But I also wanted a neutral cookie and I figured Sugar Cookies would be a yummy neutral flavored cookie. A quick search lead me to this recipe from All Recipes.
I modified the recipe based on the reviews of the recipe. But it was a pretty easy and the cookies turned out really good. Crunchy around the edges. Soft and chewy in the center. Perfect to go with ice cream. I'm sure everyone will enjoy these. I'll post all about it after the party.
2 3/4 cup all purpose flour
1 tsp. baking soda
1/2 tsp. salt
1 1/4 cup unsalted butter, at room temperature
2 cups sugar
2 large eggs
2 tsp. vanilla extract
1/4 cup decorating sugar
1) In a medium bowl, sift together flour, baking soda, and salt.
2) Cream together butter and sugar until light and fluffy, about 5 minutes. Add eggs, one at a time, beating well after each addition. Beat in vanilla extract. Scrape down the sides of the bowl. Gradually add dry ingredients and continue beating just until incorporated. Chill dough for at least 30 minutes.
3) Preheat oven to 350 deg F. Roll dough into walnut-sized balls. Roll dough balls in decorating sugar and then place on an ungreased cookie sheet. Flatten dough balls slightly.
4) Bake for 8-10 minutes until slightly browned around the edges. Allow cookies to cool on baking sheet for 5 minutes. Place cookies on wire rack to cool completely.
Thursday, April 19, 2012
Salted Caramel Pecan Brownie
My daughter absolutely loves brownies. Anytime she sees it at any store or restaurant, she always begs me to buy her some. I have a great go-to recipe for brownies that I promised her we would make together one day. But I haven't gotten around to doing it. I've been seeing many recipes for Salted Caramel Brownie recipes in the blogosphere and felt like they were calling out to me. So I thought this particular recipe from Beantown Baker was the recipe to make with my daughter.
Once the caramel sauce is made, this recipe was really easy. No need for an electric mixer because the ingredients are whisked together. The result is an ooey-gooey, chocolatey goodness that may have caused problems between me and hubby. You see, he's been doing so well with his diet this week, and blew it because of these brownies. He couldn't stop eating them. Sorry boo. But our daughter wanted some brownies :)
3/4 cup pecans
1/2 cup (1 stick) unsalted butter
1 1/2 cups semi-sweet chocolate chips
3/4 cup sugar
2 eggs
1 1/2 tsp. vanilla extract
1/2 cup plus 2 Tbsp. all purpose flour
1/2 tsp. salt
1/2 cup salted caramel sauce
Fleur de Sel for garnish
1) Preheat oven to 350 deg F. Place pecans in a single layer on a baking sheet. Bake until toasted, about 7 minutes. Coarsely chop pecans and set aside.
2) Line a 8 x 8 inch baking pan with foil, leaving several inches overhang on the sides. Grease pan with butter or cooking spray. Set aside.
3) Place 1 cup of chocolate chips and butter in a bowl over simmering water (double boiler). Stir occasionally until melted and smooth. Remove from heat.
4) Whisk in sugar, eggs and vanilla extract and continue whisking until glossy and thick, about 2 minutes. Stir in flour and salt and mix just until blended. Transfer batter onto prepared pan.
5) In a small bowl, combine half of the pecans with the caramel sauce. Drop caramel pecan mixture by spoonfuls onto brownie batter. Gently swirl with a skewer or thin metal spatula. Top with remaining pecans and chocolate chips. Bake for 35 minutes. Allow to completely cool in the pan set on a baking rack. Once cooled, grab foil overhang to lift brownies out of pan and cut into squares to serve. Store in an airtight container for 1 week.
Wednesday, April 18, 2012
Salted Caramel Sauce
I've been meaning to search for other great recipes to use my Fleur de Sel, because I absolutely love that sweet and savory flavor. My daughter love, love, loves brownies. And I came across a brownie recipe (more on that on my next blog post) using Fleur de Sel in Caramel Sauce from Beantown Baker.
Tuesday, April 17, 2012
Herb Roasted Chicken
Roasted Chicken is one of those dishes that I dread making. In fact, roasting anything (ie; turkey) really scares me. It either comes out dry or under-cooked. Which is why I always deep fry my turkey. And that always comes out perfectly. I roasted a chicken once, using a different recipe. But it didn't impress me much. For me, its easier and yummier to pick up a store-bought rotisserie chicken. So why make it now? Whole chickens were cheaper than buying the already cut-up chicken. And the package I bought came with 2 whole chickens - one chicken was already used making 40 Clove Garlic Chicken. I figured, for the sake of adding a Roasted Chicken recipe into this blog, I decided to finally use up the last whole chicken and make one.
I, unfortunately, lost the recipe for the last Roasted Chicken I made. So after doing a quick search online, I came up with this recipe from Anne Burell of the Food Network. I halved all the ingredients to make 1 whole chicken. The ingredients are pretty straightforward. However the recipe is pretty involved, having to watch the chicken every 15 minutes for about an hour or so. With that said, I wasn't really too happy with the way the dish came out. It probably didn't help that I didn't have a roasting pan with a rack. So the chicken sat in its liquid and didn't cook well. So my chicken was slightly undercooked. The flavors were really good, so I'll try to use this recipe again if I ever end up buying whole chickens again. Hopefully by then, I'll have a roasting pan for the chicken to cook better.
1 Tbsp. chopped rosemary (fresh or dried)
2 Tbsp. chopped sage (fresh or dried)
3 cloves garlic, minced
pinch red pepper flakes
4 Tbsp. extra virgin olive oil, plus more for drizzling
1 whole chicken
salt
1 medium onion, cut into 1/2 inch cubes
1 small onion, peeled and cut into 1/2 inch cubes
1 rib celery, cut into 1/2 inch cube
1 bay leaf
5 sprigs thyme, bundled together
2 cups chicken broth
1) Preheat oven to 450 deg F.
2) In a small bowl, combine rosemary, sage, garlic, red pepper flake and olive oil. Season generously with salt. Using your fingertips, carefully work your way under the skin of the chicken to separate the skin from the breast to develop a pocket. Evenly distribute the herb paste under the skin. Drizzle the outside of the chicken with more olive oil and massage onto the skin. Sprinkle generously with salt. Set aside.
3) Place diced vegetables, bay leaf, and bundle of thyme in a roasting pan. Add 1 cup chicken broth and season generously with salt. Place chicken on top of the vegetables and place in preheated oven for 15 minutes.
4) After 15 minutes, the skin should begin to brown. Lower temperature to 375 deg F and continue roasting for another 15 minutes. Turn the chicken over to cook on the other side. If most of the liquid in the roasting pan has evaporated, add another 1/2 cup of broth. Continue roasting for another 15 minutes.
5) Turn chicken back over with the breast side up and continue roasting for a final 15 minutes. The chicken is done when the temperature between the thigh and breast is between 160-170 deg F. Place chicken on a platter and tent with a foil. Allow to sit for 10-15 minutes before carving.
Tuesday, April 10, 2012
Lemon Chess Pie
I found this recipe a while ago while skimming the web for more great recipe ideas from Southern Plate sometime last year. I've been fixated on Southern desserts lately after attempting my version of a Caramel Cake. And since I had a few extra lemons from my parents' tree, I decided to make another classic Southern dessert.
This pie is reminiscent of lemon bars, but the filling is a little more custardy. It only consists of 5 ingredients. So simple and so yummy.
1 (9 inch) frozen pie crust
1 cup sugar
4 Tbsp. unsalted butter, at room temperature
4 eggs, separated
zest and juice of 3 lemons
1) Bake pie crust according just until it turns golden brown. Set aside. Preheat oven to 350 deg F.
2) Cream butter and sugar until light and fluffy, about 5 minutes. Add egg yolks and continue to beat until incorporated. Add lemon zest and lemon juice and beat well.
3) In a separate clean bowl, beat egg whites until stiff. Fold egg whites into lemon mixture until well incorporated. Pour into prepared pie crust. Bake for 25-30 minutes until set.
Thursday, April 5, 2012
Rad Na
I've been asked a few times by a co-worker of mine if I had a Rad Na recipe. I honestly didn't really know what Rad Na was, but I had always seen it in Thai menus. When ordering noodles, I always go for Pad Thai or Pad See Ewe. I had recently finally decided to have a taste of Rad Na and discovered that it is similar to Pad See Ewe, but with a gravy. So now that I know what Rad Na is, I wanted to see if I could make it at home and finally let my co-worker know that I had found a recipe.
After searching for recipes, I decided to settle with this one from Thai Table. I used fresh noodles to make this dish, but next time I'll probably work with dry noodles. Fresh noodles is just too messy to handle, as they stick to the pan. I should have learned from my first attempt at making Pad See Ewe, when the noodles became overcooked and kind of soggy. However, with that experience, I was more careful in cooking the noodles this time. This recipe looks intimidating, but once you have all your ingredients together, like most Thai recipe, its all a matter of tossing everything together. The dish came out quite good. I still prefer Pad Thai or Pad See Ewe over Rad Na, but at least now I know what it is and how to make it.
1/2 lb. thinly sliced chicken, pork, or beef
4 Tbsp. cornstarch or tapioca flour
3 1/2 cups water
3/4 lb. Chinese broccoli or regular broccoli
2-3 Tbsp. oil
1 lb. fresh, flat rice noodles (or dry rice noodles, softened)
3-4 Tbsp. dark, sweet soy sauce
3 cloves garlic, minced
2 Tbsp. sugar
2 Tbsp. yellow bean paste
1/4 tsp. white pepper
1) Massage 1 tablespoon of cornstarch (or tapioca flour) onto meat and set aside. Combine remaining 3 tablespoons of cornstarch with the water and set aside. Cut Chinese broccoli (or regular broccoli) into 2 inch pieces and set aside.
2) Heat 1 tablespoon of oil in a wok or a pan. Add noodles and carefully stir. Sprinkle 2 tablespoons of soy sauce over noodles and toss to coat thoroughly. Continue to stir until noodles are heated and separated. Remove from heat and transfer noodles to a platter.
3) In the same pan, add remaining 2 tablespoon of oil. Add garlic and meat. Stir until meat is almost cooked through. Add cornstarch water and whisk thoroughly to prevent clumping. Allow sauce to come to a boil and become translucent.
4) Add remaining 1-2 tablespoons of soy sauce, sugar and yellow bean paste. Stir and allow to simmer until sauce has thickened to a gravy consistency. (note: If the sauce isn't thick enough, make a slurry of more cornstarch and water and add to gravy).
5) Add more soy sauce and sugar to your taste. Add broccoli stems and cook for about a minute. Add remaining broccoli leaves just until heated through (note: do not overcook broccoli). Season with white pepper. Place sauce over noodles and serve hot.