Tuesday, December 27, 2011

BBQ Chicken Quesadilla with Smoked Onion Dip

I hope you all had a great Christmas surrounded by loved ones.

I must apologize that its been a while since I last posted a recipe. I've been so busy with Christmas preparations that I haven't tried any new recipes. As some of you may know, holidays are celebrated twice in our family. Once with my side of the family, the other time is spent with hubby's side. And we always host Christmas for hubby's side. So our household was pretty hectic. And since we host Christmas day at our house, we always end up with more leftovers than the two of us can handle. I say "two" because our daughter hardly eats any of the leftovers. So to avoid the tons of leftovers that takes up space in both of our refrigerators, I told all our guests to take home the leftovers. When we were left alone after the party, hubby decided to look for leftovers. He was a little disappointed to find out there was hardly anything left. I felt bad, so I planned to make it up to him.

When I saw a dish of BBQ Quesadilla with Smoked Onion Dip on Diners, Drive-ins, and Dives on the Food Network, I knew I had to find a similar recipe to make. My mouth was watering just watching the TV. So I knew this was the dish to make it up to him. After doing a quick search online, I came across this recipe from My Stained Apron and decided to make it for dinner tonight. This recipe certainly did the trick. It was so delicious and the Smoked Onion dip really enhances the overall flavor of this dish. This dish was so easy, it'll be a definite do-again recipe. The longest part of the process is cooking the onions, but don't let that deter you from making this. This is a must to be made. Hubby asked for more, and I know he will be thinking about this dish for a long time.

BBQ Chicken Quesadillas
6-8 flour tortillas (soft taco size)
3/4 cup BBQ sauce
2 1/2 cups shredded mozzarella cheese
1 boneless, skinless chicken breast, boiled and shredded
1/2 red onion, sliced
fresh chopped cilantro

1) Place 3-4 tortillas on a flat surface. Spread each tortilla with desired amount of BBQ sauce, all the way to the edge of the tortilla. Evenly distribute shredded cheese, shredded chicken and desired amount of sliced onions on top of BBQ sauce. Sprinkle desired amount of chopped fresh cilantro.

2) Spread a thin layer of BBQ sauce on the remaining 3-4 tortillas and place on top of prepared quesadilla, sauce-side down. Cook on a skillet over medium-low heat until tortilla has turned golden brown and the cheese has melted. Cut into wedges and serve hot with Smoked Onion Dip.

Smoked Onion Dip
1 medium onion, sliced
1/4 tsp. liquid smoke
1/2 cup mayonnaise
1/4 cup sour cream
1 tsp. Worcestershire sauce
1/8 tsp. black pepper
1/4 tsp. salt

1) In a medium sized skillet, saute onions over medium-low heat until it begins to soften. Add liquid smoke and continue to cook until the onions have caramelized, about 10-15 minutes, stirring occasionally. Place cooked onions in a food processor to chop finely.

2) In a medium bowl, combine prepared onion with the remaining ingredients. Adjust seasoning with more salt and pepper according to taste.

Thursday, December 15, 2011

Sugar Cookies

I've always envisioned baking sugar cookies with my daughter around the Holidays, where I would let her cut out the shapes and decorate with the frosting and sprinkles. I thought baking sugar cookies would be an easy thing to do. But when I look up the recipes, they just seem so complicated. Where the most complicated thing was the the frosting....royal icing. Where in the world can I find meringue powder? I've looked at the craft store where I buy a lot of my baking needs, but no such luck. Another problem I have is the counter space to roll out the dough. I have the old-school tiled counter top. Not ideal if you want to roll out dough of any kind. So the closest I got to sugar cookies was when I made these Soft Frosted Sugar Cookies, where I didn't really have to roll out the dough. But they still weren't the shaped cookies that I've always wanted to make with my daughter.

This week was her last week at school before her Holiday break and I decided to have her give out cookies to the kids on her last day. So she and I made Chocolate Chip Cookies and I decided to tackle the task of making Sugar cookies using this recipe from Annie's Eats. Making the cookies was really easy and the ingredients were straightforward. I decided to use our dining table to roll out the dough and have my daughter cut out the shapes, which she enjoyed doing.

To tackle the meringue powder issue, I decided to search online to see if there are any substitutes for meringue powder. Sure enough, I found this substitute, using egg whites. Its an extra step, but it definitely works if you can't find meringue powder like me. Its definitely worth the extra step to see my daughter having a good time frosting and decorating these yummy cookies.

Cookies
1/2 cup (2 sticks) unsalted butter, at room temperature
1 cup confectioner's sugar
1 egg, beaten
1 1/2 tsp. almond extract
1 tsp. vanilla extract
1 tsp. salt
2 1/2 cups all purpose flour, sifted

1) Using an electric stand mixer, cream butter over low-medium speed. Slowly add confectioner's sugar. Blend in egg, almond extract, vanilla extract, salt and flour. Continue beating until well incorporated. Form dough into a disk and wrap with plastic wrap. Chill dough until firm.

2) Preheat oven to 375 deg F. Grease 2-3 cookie sheets.

3) Roll out dough to 1/4-inch thickness on a well-floured surface. Cut with cookie cutters and place on prepared cookie sheets. Bake for 8-10 minutes, but do not let the cookies brown. Cool completely before frosting and decorating.

Royal Icing
2 egg whites
2 Tbsp. water
1/8 tsp. cream of tartar
4 Tbsp. sugar

4 cups confectioner's sugar, sifted
5 Tbsp. water
food coloring

1) In a bowl of a double boiler, whisk together egg whites, 2 tablespoons of water, cream of tartar, and sugar. Place bowl over boiling water stir frequently with a rubber spatula. Cook mixture until temperature from a candy thermometer reads over 160 deg F. Remove from heat and cool slightly.

2) Using an electric stand mixer with a paddle attachment, combine egg mixture with confectioner's sugar on low speed for 7-10 minutes, until icing has a matte appearance. Remove bowl from the mixer and add water, 1 tablespoon at a time until desired consistency.

3) Place icing in separate bowls per food coloring. Frost cooled cookies and immediately decorate (with sprinkles). Allow frosting to set before serving.

Wednesday, December 14, 2011

Tom Kha (Thai Coconut Soup)


I've noticed that I've been getting sick a lot more frequently lately. Yup, you guessed it. I'm sick again. I think this is the 2nd time in the past 6 months that I've been home sick with either a cough or cold or both. This time, this cough hit me pretty hard. I've had it for almost a week with no relief in sight. Before I had my daughter, it was rare that I would be out sick from work. I'll have a slight cold, but not enough to have to call-in sick. My motto back then was "through rain, sleet, hail, or snow, I'll still report to work." Nowadays, I get so sick that my whole body aches and I can't even get out of bed. Call it age or stress or whatever the cause may be, whenever I'm sick, I always crave for some soothing soup. And because of my sore throat, I wanted a sour soup.

I've made this recipe for Tom Kha a while ago but haven't put it in this blog yet. And I've been meaning to make it again. We order Tom Kha at our favorite Thai restaurants most often during the cold season. And when I found it in my Thai cookbook, I couldn't believe how easy it was. The only hard part was getting all the ingredients. I'm fortunate to have my office close to a Thai market where I can get most of my ingredients whenever I feel like cooking Thai food.

4 stalks of lemon grass, roots trimmed
2 (14 oz) cans coconut milk
2 cups chicken broth
1 inch piece fresh ginger, peeled and thinly sliced
10 black peppercorns, crushed
1 boneless, skinless chicken breast, cut into bite-sized pieces
10-12 shrimps, peeled and de-veined
1 cup button mushrooms
1/2 cup baby corn, cut into bite-sized pieces
4 Tbsp. lime juice
3 Tbsp. fish sauce
1-2 Tbsp. Thai chili paste
chopped green onions, for garnish
chopped fresh cilantro, for garnish

1) Cut off the lower 2 inches from each lemon grass stalk and chop finely. Bruise the remaining pieces of stalk.

2) Bring the coconut milk and broth to boil in a large stock pot over medium heat. Add chopped and bruised lemon grass, ginger, and peppercorns. Reduce heat to low and simmer gently for 10 minutes. Strain the soup.

3) Return the soup into the pan over low heat. Stir in chicken, mushrooms, and corn. Simmer gently, stirring occasionally for 5-7 minutes, or until chicken is cooked. Add shrimps during the last 2 minutes of simmer. Stir in lime juice, fish sauce, and Thai chili paste until well incorporated. Serve hot in bowls with green onions and cilantro for garnish.

Wednesday, December 7, 2011

Mint Chocolate Chip Cookies

With the Holidays comes Holiday baking. One of my favorite things to do around the Holidays is not shopping. But baking. Don't get me wrong. I love shopping just as much as the next guy/gal. However, I find I'm most happiest in my kitchen baking (or cooking). Every year, I always try to bake something new to give out as Holiday gifts for our neighbors. There's something about homemade gifts that makes me feel so domesticated like a housewife. Wishful thinking, I guess. But I do like to make homemade gifts. Besides, its the neighborly thing to do.

I discovered this recipe, of all places, from Facebook. I'm a fan of the Betty Crocker group, and everyday, they post yummy recipes and this particular recipe was posted. I love the combination of mint and chocolate. To me, this flavor combination is what Christmas is all about and what reminds me most of Chistmas. Its the time of year when you'll see a lot of Peppermint Hot Chocolate or Peppermint Mocha being advertised (think Starbucks or McDonald's). So its the perfect time to make these delicious cookies. If you love mint and chocolate, you'll love these cookies. So easy, yet so yummy. Eat these cookies and it'll remind you of eating a scoop of mint & chip ice cream.

1 pouch sugar cookie mix (I used Betty Crocker)
1/2 cup unsalted butter, softened
1/4 tsp. mint extract
6-8 drops green food color
1 egg
1 cup mint baking chips
1 cup semi-sweet chocolate chips

1) Preheat oven to 350 deg F.

2) In a large bowl, combine cookie mix, butter, mint extract, food color and egg. Mix thoroughly using a hand mixer or an electric stand mixer until soft dough forms. Stir in mint and chocolate chips.

3) Using a small cookie scoop or teaspoon, drop dough 2 inches apart on an ungreased cookie sheet. Bake for 8-10 minutes or until the cookie sets. Cool for 3 minutes, and then transfer to a cooling rack to cool completely. Store in an airtight container at room temperature.

Monday, December 5, 2011

Chocolate Tres Leches Cake

Christmas is less than 3 weeks away. So I've been trying to get ideas for our Christmas meal with the families. I was thinking of a Latin themed menu. Mainly because a lot of my Latin dishes can be made ahead of time. There's just too much for me to do that I have to plan and make things ahead. I've thought of some casserole dishes that I can prepare ahead and then bake the day-of. And of course there's the crock pot that I can have on overnight to help save time. What I have left is dessert. I don't think I have the energy this year to bake cupcakes that I have to bake and frost. And then this recipe came to mind from What's Cookin' Chicago? that I've had saved up for a while. Joelen's version is gluten-free. So I decided to use my go-to Chocolate Cake recipe.

I remember having a Chocolate Tres Leches cake a while ago from The Kogi truck and I thought how great of an idea it was. And when I saw this recipe, I knew I had to make it. I love the traditional Tres Leches cake. But having it in a chocolate form just brings this yummy Mexican dessert over-the-top good.

1 recipe Chocolate Cake divided into 2 pans, cooled

Tres Leches
1 cup sweetened condensed milk
1 cup evaporated milk
1 cup heavy cream

whipped cream for topping

1) Combine milks in a medium bowl and mix until thoroughly incorporated. Remove cakes from their pans and place each cake on separate platters. Using a fork, generously poke numerous holes into prepared cakes. Pour milk mixture over both cakes. Refrigerate overnight. Serve with whipped cream on top.

Friday, December 2, 2011

Mashed Potato Soup


Its been about a week since Thanksgiving, and I still have some leftover side dishes in the fridge that I have to decide whether to throw away or not. Specifically mashed potatoes, dressing, gravy and cranberry sauce. My co-worker, Stacy, had mentioned that a friend of hers had made tons of mashed potatoes for Thanksgiving and then used it to make some delicious potato soup for her because she was sick this past weekend. I asked her to try to get the recipe and she lead me to this from The Rachael Ray Show.

This recipe couldn't be any easier. It asks for leftover mashed potatoes and chicken stock, but I happen to have turkey stock from our Thanksgiving turkey carcass. It was so delicious and so comforting for a chilly evening like it was last night. Its a potato soup kind of night.

oil
6 slices of bacon, chopped
4 Tbsp. butter
1 medium onion, chopped
4 Tbsp. flour
4 cups chicken or turkey stock
2 cups leftover mashed potatoes
1 cup shredded cheddar cheese
chopped chives or green onions for garnish

1) In a medium pot, heat a drizzle of oil over medium-high heat. Add bacon and cook until crispy. Remove bacon and place on a paper towel-lined plate. Set aside.

2) Drain off excess bacon fat from the pot and add butter. When it is melted, add onion and cook until softened, about 5 minutes. Sprinkle flour into pot and cook with a wooden spoon for 1 minute. Whisk in stock and bring to a bubble. Cook until slightly thickened, about 2-3 minutes.

3) Whisk in mashed potatoes. Stir in cheddar cheese with a wooden spoon and cook until potatoes are hot and the cheese is melted. Transfer to a serving bowl and garnish with bacon and chopped chives/green onions.

Thursday, December 1, 2011

Chicken & Shrimp Pad Thai

Ever since I saw this recipe for Pad Thai from What's Cookin' Chicago?, I have been craving it. I haven't made Pad Thai since making this version, which is a little more time consuming. It requires to boil the Pad Thai sauce to caramelize it. And I don't have time for that tonight. Besides, that version was a little too dry for my taste. I like my Pad Thai to be a little more saucy. Joelen's version seemed much quicker and easier. It had a little bit of kick to it from the chili, but it was quite good. And the noodles were saucy. Just the way I like it.

8 oz Thai Rice Stick noodles

Pad Thai Sauce
1 1/2 Tbsp. tamarind paste, dissolved in 1/4 cup warm water
3 Tbsp. fish sauce
1/2 - 1 Tbsp. Thai chili sauce, or more to taste
1/4 cup dark brown sugar

2 Tbsp. oil
4 cloves garlic, minced
1 lbs. boneless, skinless chicken breast, cut into bite-sized cubes
1 lb. shrimp, peeled and de-veined
1/4 cup chicken stock
3 cups fresh bean sprouts
3 green onions, sliced
1/2 cup minced fresh cilantro
1/3 cup roughly chopped peanuts
lime wedges for garnish

1) In a large bowl, place noodles and pour hot water over them to cover. Allow to soak noodles until noodles are softened and al dente. Be careful that they do not get too soft. Drain and set aside.

2) Prepare Pad Thai sauce by combining tamarind paste, fish sauce, Thai chili sauce, and brown sugar in a small bowl. Set aside.

3) In a wok or large saute pan over medium-high heat, add 1-2 tablespoons of oil. When it begins to shimmer, add minced garlic and stir-fry until fragrant, about 30 seconds. Add chicken and stir-fry until opaque in color, about 5-7 minutes. Add shrimp during the last 2 minutes of cooking the chicken.

4) Add chicken stock and Pad Thai sauce, stirring to coat the chicken and shrimp. Add the noodles, and using tongs carefully stir-fry the noodles to coat with the sauce. Continue to stir fry until noodles have soaked up most of the sauce, being careful not to break the noodles. Add bean sprouts, green onions and cilantro. Toss to combine. Serve and garnish with more chopped cilantro, chopped peanuts and lime wedges.

Wednesday, November 30, 2011

Make-Ahead Gravy

I've always wanted to make gravy from scratch for Thanksgiving, but because I deep fry our turkey, I don't have turkey pan drippings to make the gravy. So I always resort to the powder or bottled version from the supermarket. Then I got the idea of making gravy using stock after doing some searches online. And what perfect timing it was when this recipe came up on my reader from The Brown Eyed Baker. I happen to always have Turkey stock made from the turkey carcass of our Thanksgiving luncheon, so this recipe came in handy.

1/2 cup (1 stick) unsalted butter
1 1/2 cup finely chopped onions
1/4 cup all purpose flour
3/4 tsp. salt
1/2 tsp. ground black pepper
2 cups turkey or chicken stock, heated
1 Tbsp. heavy cream

1) In a large saute pen, melt butter over medium heat. Add onions and cook for 12-15 minutes until lightly browned. (Do not rush this step!)

2) Sprinkle flour into pan and whisk. Add salt and pepper. Cook for 2-3 minutes. Whisk in stock and cook uncovered for 4-5 minutes until thickened. Add cream and serve.

(Note: This gravy can be frozen. When ready to use, thaw in refrigerator and reheat over the stove or microwave, adding a splash of stock to loosen the gravy).

Tuesday, November 29, 2011

Sage, Sausage & Apple Dressing

I've been searching high and low for the perfect dressing to serve for Thanksgiving. I don't want to use the boxed stuff. But its been hard to find a tried and true dressing recipe. One thing was for sure. I really wanted to use sausage and apples in the recipe. So I found this recipe that was the best of both worlds. The use of boxed cubes and a recipe using sausage and apples. And it came out so good. To add a little twist to it, I used half of the recipe and added some dried cranberries and toasted walnut pieces for a little bit more depth of flavor. I think I may have found my dressing recipe.

16-ounce bag stuffing cubes
6 Tbsp. unsalted butter, plus more to grease the pan and topping
1 lb. sage sausage (I used Jimmy Dean's Sage breakfast sausage)
1 medium onion, chopped
2 Granny Smith apples, peeled, cored, and chopped
1-2 ribs celery with eaves, chopped
1 medium carrot, finely chopped
1/2 cup corn kernels
1/2 tsp. salt
3 3/4 cups chicken broth
1/4 cup chopped fresh flat-leaf parsley
1/2 cup toasted walnut pieces (optional)
1/2 cup dried cranberries
2 eggs, beaten

1) Preheat oven to 325 deg F. Butter a 3-quart casserole dish.

2) Melt 2 tablespoons of butter in a large skillet over medium-high heat. Add the sausage and break up with a wooden spoon. Cook until no longer pink, but not so much that its dry, about 5 minutes. Place stuffing cubes in a large mixing bowl and add cooked sausage and pan drippings into the bowl.

3) Melt the remaining butter in the pan. Add the onion, apple, celery, carrot, corn, and salt. Cook until the vegetables get soft, about 5 minutes. Add the broth and parsley and bring to a boil.

4) Pour mixture over the stuffing cubes and toss until evenly moistened. Mix in walnuts and cranberries (if using) and eggs. Loosely pack the dressing in the prepared pan and cook uncovered until the top forms a crust, about 40 minutes. Drizzle about 2 tablespoons of turkey pan drippings or melted butter over the top. Cook until the top is crisp and golden, about 20 minutes more.

Monday, November 28, 2011

Scalloped Potatoes revisited


I know its been over a week since my last blog post. Honestly, I had been working myself up for this recent Thanksgiving holiday. Keeping busy by planning my strategy on how to tackle the tasks at hand. My menu has been the same ever since I volunteered to host Thanksgiving dinner for my side of the family. We always have my famous Deep Fried Turkey, Creamed Corn, Mashed Potatoes, and Scalloped Potatoes. Scalloped Potatoes is the one dish my brother looks forward to. However, my Scalloped Potatoes are either a hit or miss. They either are somewhat undercooked, or not cheesy enough. Then a couple of weeks before Thanksgiving, this recipe came up on my reader from the Brown Eyed Baker. The key for perfect Scalloped Potatoes every time is to boil the entire mixture together prior to baking it. I can't believe I didn't think of that before. They came deliciously.

2 Tbsp. unsalted butter
1 small onion, minced
2 cloves garlic, minced
3 cups heavy cream
1 cup milk
4 sprigs of fresh thyme
2 bay leaves
2 tsp. salt
1/2 tsp. ground black pepper
4 lbs. russet potatoes, peeled and thinly sliced
1 cup shredded cheese

1) Preheat oven to 350 deg F.

2) In a medium sized stock pot, melt butter over medium-high heat until foaming subsides, about 1 minute. Add onion and saute until it softens and begin to brown, about 4 minutes. Add garlic and saute until fragrant, about 30 seconds. Add cream, milk, thyme, bay leaves, salt, pepper, and potatoes. Bring mixture to simmer. Cover, adjusting heat as necessary to maintain a light simmer. Cook until potatoes are are almost tender (paring knife can be slipped into and out of center of potato slice with some resistance), about 15 minutes.

3) Remove and discard thyme and bay leaves. Transfer potato mixture into a 3-quart casserole or gratin dish. Sprinkle top with cheese. Bake until cream has thickened, is bubbling around the sides, and the top has turned golden brown, about 20 minutes. Cool for 10 minutes before serving.

Saturday, November 19, 2011

Chicken Florentine Lasagna


I'm always on the lookout for a good make-ahead meal. One of the best make-ahead meal idea is pasta. However, most pasta dishes I've seen have red sauces. I wanted to make something with a white sauce. I remember eating a Chicken Florentine pasta at the Olive Garden a while ago and decided to re-create that dish with lasagna. This is what I came up.

10 lasagna noodles, cooked according to package directions
1 container ricotta cheese
1/2 cup grated Parmesan cheese
2 cups shredded mozzarella cheese
1 egg
salt & pepper to taste
2 cups chopped, cooked chicken
3 cups prepared Alfredo sauce
1 (12 oz) bag frozen spinach, thawed and water squeezed out
1 cup Panko breadcrumbs
3 Tbsp. butter, melted

1) Preheat oven to 400 deg F.

2) In a medium bowl, combine ricotta cheese, Parmesan cheese, mozzarella cheese and egg. Mix until incorporated. Season with salt and pepper to taste. Stir in drained spinach.

3) To assemble the lasagna, spread 1/2 cup Alfredo sauce on the bottom of 9 x 13 inch pan. Place one layer of lasagna noodles on the bottom of the pan. Evenly spread spinach mixture over lasagna noodles and top with 1 cup of chopped chicken. Spread 1 cup of Alfredo sauce and repeat layering until you've reached 3 layers (The top layer should be the Alfredo sauce). Top with remaining 1 cup mozzarella cheese.

4) In a small bowl, stir together breadcrumbs and melted butter. Evenly top breadcrumbs mixture over lasagna. Bake for 40-45 minutes until it becomes bubbly.

Wednesday, November 9, 2011

Pumpkin & Sausage Manicotti


With the fall season in full swing, I thought I'd try to find recipes to use up some of the pumpkin puree I made a couple of weeks ago. Instead of the usual sweet recipe, I wanted to use the pumpkin puree in a savory dish. I've found a few recipes for pumpkin pasta or pumpkin lasagna. And so I settled with this recipe for Pumpkin & Sausage Manicotti from the Betty Crocker website, which came out pretty good. The recipe called for mozzarella cheese as its topping. However, I didn't have much. So I mixed my leftover mozzarella cheese with a Mexican blend cheese. The cheese flavor came out too strong, so I'll definitely stick with using all mozzarella cheese on my next attempt to make this recipe.

16 uncooked manicotti shells
1 lb. bulk Italian sausage
2 large cloves garlic, minced
2 Tbsp. finely chopped sage leaves
1 egg
1 (15 oz) container ricotta cheese
1 cup pumpkin puree
1/2 cup shredded Parmesan cheese
1/2 tsp. ground pepper
2 cups shredded Italian cheese blend or mozzarella cheese
3 cups Alfredo pasta sauce
fresh sage for garnish

1) Preheat oven to 350 deg F. Cook and drain pasta according to package directions, using minimum cook time.

2) In a medium skillet, cook sausage, garlic and 1 tablespoon sage over medium heat for 8-10 minutes, until sausage is no longer pink. Drain.

3) In a large mixing bowl, beat egg. Stir in ricotta cheese, pumpkin, Parmesan cheese, pepper, 1 cup cheese, the remaining 1 tablespoon of sage and cooked sausage.

4) Spread 1 cup Alfredo sauce on the bottom of a 13x9 baking dish. Fill pasta shells with sausage mixture. Arrange the stuffed shells over the sauce. Pour the remaining 2 cups Alfredo sauce evenly over the shells. Cover and bake for 30-35 minutes or until hot. Uncover and top with remaining 1 cup cheese. Bake for another 5-10 minutes, until cheese is melted. Garnish with sage leaves.

Monday, November 7, 2011

Biscoff Cookie Dough Balls


This is my new addiction.......Biscoff Spread.

Like everyone else familiar with Biscoff, I first had my taste of the Biscoff cookies on a plane ride going somewhere (I don't exactly remember where to). I was probably in my teens then, and I wasn't much of a novice in the kitchen as I am now. So I didn't appreciate those yummy cookies that tasted almost like a ginger snap cookie, but not as heavy on the spices. Until last holiday season when one of my sister-in-laws brought a packet for everyone. Oh, I remember these! was my first thought.

I've recently learned about Biscoff spread when recipes using it have been popping up all over the blogosphere lately. And then this recipe for Biscoff Cookie Dough Balls popped up on my reader from The Novice Chef. Everyone who knows me and those who've been following this blog know how much I looooooove anything that is cookie dough. From Cookie Dough Cupcakes, to Cookie Dough Truffles, if it has anything to do with cookie dough, I'm all over it.

These cookie dough balls were heaven in a small package. Jessica, from the Novice Chef, was so dead-on about these. They are best eaten straight out of the oven, when they are gooey and warm. But if you can't eat them all right away, store them in an air-tight container and pop them in the microwave for 8 seconds to bring them back to their ooey gooey-ness. Perfect with a glass of milk.

6 Tbsp. unsalted butter, softened
1/3 cup Biscoff spread
1/2 cup light brown sugar, packed
1/4 cup granulated sugar
1 egg
1 tsp. vanilla extract
2 cups all purpose flour
1/2 tsp. baking powder
3/4 tsp. salt
3/4 cup semi-sweet chocolate chips

1) Preheat oven to 350 deg F. Line a large cookie sheet with parchment paper and set aside.

2) In a bowl of stand mixer, cream together butter, Biscoff spread, and sugars until well combined. Add egg and vanilla extract and beat thoroughly until well combined, scraping down the sides of the bowl.

3) In another bowl, whisk together flour, salt and baking powder. Add half of the dry ingredients to the wet ingredients and beat on medium-low speed until it starts to come together. Add the remaining half of the dry ingredients and continue mixing until well combined. Do not over-mix. Just let it all come together but do not beat longer than that. The dough will be dry.

4) Fold in the chocolate chips. Scoop into balls using a 1 1/2" scoop (or guess using your hands). Place them evenly spaced apart on prepared cookie sheet. Bake for 10 minutes. Cool for 2-3 minutes before transferring on a cooling rack. Serve immediately. Store leftover cookies in an air-tight container and microwave for 8 seconds to warm up and re-serve.

Thursday, November 3, 2011

Loco Moco


If you're a fan of Hawaiian food, you know all about the Loco Moco. Its a bed of rice, with a hamburger patty, drenched in gravy and then topped with a fried egg. Sounds yummy, huh? And it couldn't be more easy. If you're in Hawaii, however, there are different versions to this beloved plate lunch, where the difference is in the gravy. The gravy isn't merely "just gravy." Local restaurants make their own house-special gravy to make it distinctly "theirs." Take the Loco Moco from Rainbow Drive-In, for example. Their gravy tastes almost like chili. But if you're not Rainbow Drive-in, you settle for the next best thing. Store-bought gravy. Which is what I use. And it comes out perfectly okay. Serve this with a side of Hawaiian Plate Lunch-style Macaroni Salad and you have yourself an authentic Hawaiian plate lunch.

cooked steamed white rice
cooked hamburger patties
your favorite gravy
fried eggs, over-easy

1) To assemble the Loco Moco, scoop desired amount of steamed rice on a plate. Place 1 hamburger patty on top of rice. Ladle a generous amount of your favorite prepared gravy over the hamburger and top with a fried egg. Serve with a side of macaroni salad.

Monday, October 31, 2011

Halloween Popcorn


Happy Halloween!!!

I thought I'd do something fun and festive with my daughter to commemorate Halloween today. So when this recipe for Halloween Popcorn came up on my reader from Sing for Your Supper, it gave me a great idea. I didn't want to buy a whole bag of candy corn, so my daughter and I fished out the small packets of candy corn from our Halloween candy stash we were going to pass out tonight. The kids won't miss it. Anyway, this recipe can't be more easy. It only takes 4 ingredients and is fun and yummy.

1 bag plain microwave popcorn, popped
candy corn
6 ounces white chocolate chips
Halloween sprinkles

Place popped popcorn and candy corn in a very large bowl. Melt chocolate in the microwave in 30 second increments, stirring each time, until melted. Drizzle melted chocolate over the popcorn and candy corn. Stir to coat each piece of popcorn. Pour mixture over a tray lined with wax paper and spread into an even layer. Sprinkle with Halloween sprinkles and allow to cool for 15-30 minutes. Break into pieces.

Thursday, October 27, 2011

Hawaiian Plate Lunch-style Macaroni Salad


One of my favorite parts of a Hawaiian plate lunch is the side of macaroni salad. No matter what the plate lunch is, I always have to have the mac salad. I've had many failed attempts at making a plate lunch mac salad, because I learned that its not merely about slapping on some mayonnaise on some elbow macaroni pasta. There was always something lacking.

After our recent trip to Hawaii, I've been on a Hawaiian food kick lately. Always looking for ways to recreate our meals from the trip. But the mac salad is always the missing part of the meal. After doing a quick search, I've adapted this mac salad from a recipe I found on HawaiiMagazine.com and it came out just as I remembered a mac salad should taste like. I learned that the secret to a great plate lunch mac salad is using Hellman's Mayonnaise. Lots of it. And adding grated onion and eggs into the salad. Mmmmm.....'ono!

1/2 lb. elbow macaroni
1 celery stem, chopped finely
1/4 cup finely chopped carrots
1 Tbsp. finely grated onion
2 hard boiled eggs
1 1/4 cup Hellman's Mayonnaise, more to make it creamy
salt to taste

1) Cook macaroni until it is almost overcooked. Drain and cool completely.

2) Combine prepared macaroni pasta, celery, carrots, and onions in a large bowl. Using a fine mesh sieve, scrape the hard boiled eggs through the sieve and into the bowl of pasta. Stir in mayonnaise. Season with salt to taste. Refrigerate for at least an hour before serving.

Wednesday, October 26, 2011

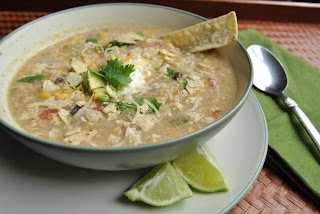
Green Chicken Enchilada Soup


With the fall season in full swing, the weather starts to somewhat cool down. Even here in SoCal. And with cooler weather comes the flu season. My daughter has been trying to shake off a cold for the past 2 1/2 weeks, and is now trying to fight off a low-grade fever. Hubby and I are trying to fight off the onset of a cold ourselves. Our cold isn't full blown, but we feel it starting to creep in. And if we're all sick, its no bueno.

This recipe popped up on my reader recently from What's Cookin' Chicago? that I felt it was fitting to make for this cool weather. It was super easy to make and tasted so good and comforting. When it first came out of the crock pot, I thought it was a little spicy. But after adding all the garnishes such as avocado and sour cream, the flavors and spice balanced so well.

The author of What's Cookin' Chicago?, Joelen, recently discovered she requires a gluten-free diet. Therefore, this recipe is gluten-free. One of my good friends, Cathy, has been requesting me to start making gluten-free foods for a while now. And honestly, I don't know a thing about being gluten-free. So I'm glad that Joelen's blog features more of this kind of cuisine. So this recipe (and all future gluten-free dishes) is for you, Cathy :)

1 (15 oz can) black beans, rinsed and drained
1 (14.5 oz can) sweet corn, drained
1 (14.5 oz can) Rotel diced tomatoes and jalapenos
1/2 cup chopped onions
1/2 cup chopped bell peppers
1 (16 oz bottle) salsa verde or green enchilada sauce
2 cups chicken broth
1/2 cup milk
salt to taste
2 whole boneless, skinless chicken breast
3 Tbsp. cornstarch
3 Tbsp. water

Garnishes:
chopped avocado
crushed tortilla chips
chopped cilantro
sour cream
shredded cheese

1) In a crock pot, combine beans, corn, tomatoes, onions, bell peppers, salsa verde/enchilada sauce, chicken broth and milk. Season with salt to taste.

2) Place chicken breast into crock pot and cover. Cook on low for 6-8 hours, or on high for 3-4 hours.

3) Remove chicken and cut or shred into bite-sized pieces. Return shredded chicken in the crock pot. In a small bowl, combine cornstarch and water to make a slurry. Stir into soup to thicken slightly. Serve with your favorite garnishes.

Tuesday, October 25, 2011

Pumpkin Cheesecake Cupcakes


I love the fall season. The weather starts to cool, and the air is filled with the warm scent of cinnamon and nutmeg. Its also the precursor to the upcoming holiday season. Once Halloween is here, then its Thanksgiving, and then Christmas. My favorite holiday. One thing that's in abundance right now are pumpkins. Its pumpkin season and I've been scouring the web for recipes to use with the pumpkins we bought last week at the farm around the corner from our house.

One of my favorite pumpkin recipes, and one that hubby always requests me to make every fall, is my Pumpkin Cake Roll. I've always wanted a cupcake version of this yummy dessert and have always failed in my attempts. Then I found this great recipe for Pumpkin Cheesecake Cupcakes from Your Cup of Cake. Cream cheese and pumpkin go together so well that I knew this recipe would be awesome. And it was. The cake was really moist with a touch of cheesecake. I've finally found the perfect pumpkin cupcake.

Cheesecake filling
8 oz package cream cheese, softened
1/2 cup sugar
1 egg
1 tsp. vanilla extract

Cake
1/2 cup oil
1/3 cup applesauce
1 cup sugar
1/2 cup brown sugar, lightly packed
2 eggs
2 1/3 cup all purpose flour
1 Tbsp. pumpkin pie spice
1/2 tsp. salt
1/2 tsp. baking soda
1 tsp. baking powder
3/4 cup milk
1 3/4 cup pumpkin puree

1) To make the cheesecake filling, beat together cream cheese and sugar until evenly combined. Add egg and vanilla and continue beating until smooth. Place in a bowl, cover and chill in the freezer while making the cake batter.

2) Preheat oven to 350 deg F. Line pans with cupcake liners.

3) In a bowl of a stand mixer, beat together oil, applesauce, sugar and brown sugar on low speed. Add eggs one at a time and mix well. Do not over-beat or beat on high.

4) In another bowl, combine flour, pumpkin pie spice, salt, baking soda and baking powder. Add half of the dry ingredients into wet ingredients and beat over low-medium speed just until combined. Add milk. Add the remaining dry ingredients and continue beating until combined. Add pumpkin puree.

5) Scoop cupcake batter into cupcake liners about 3/4 full. Place a spoonful of the cheesecake batter on top of cupcake batter. Slightly swirl cheesecake batter into cupcake batter. Bake for 15-20 minutes, until toothpick test comes out with no orange batter (the cream cheese may come off a little). Cool completely before frosting.

Cinnamon Cream Cheese Buttercream
8 oz package cream cheese, softened
1/2 cup (1 stick) unsalted butter, at room temperature
3-4 cups confectioner's sugar
1 tsp. vanilla extract
1/4 tsp. ground cinnamon
milk, if needed
cinnamon sugar (optional)

1) Cream together cream cheese and butter for about 3-4 minutes until smooth on medium speed. With the mixer on low, add confectioner's sugar, 1 cup at a time until desired consistency. Add vanilla and cinnamon. Add milk if necessary to thin out frosting to reach desired consistency. Frost cupcake and top with cinnamon sugar (optional).

Wednesday, October 19, 2011

Lime Coconut Macadamia Nut Cheesecake


*You put the lime in the coconut......* My daughter loves that tune.

Have you ever tried the Mango Key Lime Cheesecake at the Cheesecake Factory? OMG! It is to DIE for. I'm not much of a cheesecake eater, but occasionally when we find our way into the Cheesecake Factory, I like to split a cheesecake with someone or with a few people. One day, one of my good friends and I met for lunch and I wanted to try the Mango Key Lime Cheesecake. But I was stuffed. So I took it to-go. Then when I went home and took that first bite, I was like "where have you been all my life?" It was sinfully delicious. Its a Key Lime cheesecake filling, topped with a mango custard and a coconut macadamia nut crust. Sounds good, huh?

From our recent trip to Hawaii, I brought several bags of chopped macadamia nuts to bake with. I had so many plans for these little babies. And making a Lime Coconut Macadamia Nut Cheesecake was one of them. I did a quick search and found this recipe for a Toasted Coconut and Macadamia Nut Tropical Cheesecake from The Prepared Pantry. The recipe sounded just like the Mango Key Lime Cheesecake, but without the mango. I decided to give it a try and modify it a tiny bit by adding some coconut syrup to the crust to give some extra coconut flavor. It isn't the Mango Lime cheesecake, but it was pretty good. Next time, I have to try to find the mango custard to put on top of this cheesecake.

Crust
1 1/2 cups vanilla wafer crumbs
3/4 cup chopped macadamia nuts
1/3 cup toasted shredded coconut
4 1/2 Tbsp. butter, melted
2 Tbsp. coconut syrup
2 Tbsp. sugar

Filling
2 (8 0z) packages cream cheese
1 (14 oz can) condensed milk
3 large eggs
1/4 cup lime juice, preferably key lime
2 Tbsp. finely grated lime peel
whipped cream topping
toasted shredded coconut for garnish
lime slices for garnish

1) Preheat oven to 325 deg. F.

2) In a medium bowl, combine all the ingredients for the crust. Mix until well combined. Press the mixture across the bottom and up the sides of a 10-inch springform pan. Refrigerate crust while making the filling.

3) Using a stand mixer, slowly beat cream cheese until soft and smooth. Add condensed milk, eggs, lime juice, and lime peel. Continue beating just until smooth. Pour mixture into prepared crust. Bake for 50 minutes or until cheesecake is firm.

4) Allow to cool for 10 minutes. Loosen the sides using a spatula and remove the ring. Refrigerate to cool completely. Garnish with whipped cream, toasted coconut and lime slices.


Monday, October 17, 2011

Chocolate Pumpkin Patch Halloween Cupcakes


I recently came across some pumpkin spice-flavored marshmallows in the shape of pumpkins. I knew my daughter would love them (because she loves anything that is marshmallow) so I bought a bag. The bag had some fun decorating ideas with the use of these pumpkin-shaped marshmallows. Then I strolled into Williams-Sonoma the next day and my daughter wanted me to buy some Halloween sprinkles. With all these festive decorating tools, I thought it would be fun to make Halloween cupcakes with my daughter.

Last year, I made Vanilla Halloween cupcakes and she wasn't much interested in helping me decorate them. This past year, she's shown a great interest in helping me bake and decorate, so she was happy to help out this time around. The bag of marshmallows suggested making a pumpkin patch on the cupcakes using the marshmallows. So I thought a chocolate cupcake base would look cool using my Chocolate Cake with Chocolate Cream Cheese frosting recipe, or any chocolate cupcake recipe. I think they turned out pretty cool. We also used the Halloween sprinkles, which she loved using on the cupcakes.

Pumpkin-Spiced marshmallows
sweetened shredded coconut
green food coloring

1) Prepare chocolate cake recipe according to directions. Line muffin tins with cup and fill with the batter about 3/4 full. Bake for 25-30 minutes, or until toothpick test comes out clean. Cool completely before frosting.

2) Prepare frosting according to directions. Spread frosting on top of cooled cupcakes. Set aside.

3) Place shredded coconut in a small bowl. Add a few drops of green food coloring and stir coconut to distribute the color. Continue adding food coloring until desired shade of green is established. Sprinkle colored coconut on top of frosted cupcake. Arrange 2 pumpkin-spiced marshmallows on top of colored coconut.

Wednesday, October 12, 2011

Sausage Pancake Egg Sandwich


I've been looking for great breakfast recipes to make on a lazy Saturday and found this recipe from Paula Deen a while ago. Unfortunately, I haven't had a chance to make it until recently. We've been on a cereal diet since we got back from our vacation in Hawaii. And so we've only been eating cereal for breakfast. But I decided one morning to splurge and have a good breakfast and this recipe came to mind.

This definitely was a good breakfast. Hubby really loved it. It isn't for the diet conscious, but its okay to splurge every now and then. This dish gives a great balance of salty and sweet from the pancake or maple syrup used to top it off. A definite make-again recipe.

Pancakes
2 1/2 cups self rising flour
pinch of salt
2 cups milk
2 eggs
1/4 cup oil, plus more for cooking
butter

1) Preheat oven to 200 deg F.

2) Combine flour and salt. Mix milk, eggs, and oil together. Add milk mixture into flour mixture and stir until well combined.

3) Heat a skillet or pan over medium heat. Rub butter on the bottom of the pan and add about a teaspoon of oil to prevent the butter from browning. Ladle 1/4 cup of the batter, for each pancake, onto the skillet. Cook pancakes for 2-4 minutes until the bottoms are brown. Flip the pancake over to cook on the other side, until lightly browned. Place pancakes in preheated oven until ready to serve.

Scrambled eggs
8 eggs
salt & pepper to taste
2 Tbsp. butter
4 cooked sausage patties, crumbled

cheese slices (Swiss or cheddar)
maple or pancake syrup
butter

1) Heat a large skillet or pan over medium heat. In a large mixing bowl, whisk eggs until the whites and yolks are combined. Season with salt and pepper to taste.

2) Melt butter in the skillet. Add eggs and reduce heat to medium-low. Add sausages and stir frequently until eggs are cooked through. Remove from heat.

3) To assemble the sandwich, place a slice of cheese on top of one pancake. Top with scrambled eggs. Place another slice of cheese on top of scrambled eggs and cover with another pancake. Place a dab of butter and drizzle with syrup and serve warm.

Tuesday, October 11, 2011

North Shore Shrimp Truck-Style Shrimp Scampi


*say that fast 10 times*

Hubby and I have been reminiscing about our recent trip to Hawaii. We miss it so much. Especially the food. Whenever we eat something really good that it left a lasting impression, the first thing that comes to mind is "I wonder if I can make this back home."

On one of our trips to Oahu's North Shore a few years ago, our family tagged along. As well as one of my cousins and her daughter. We decided to have lunch at Giovanni's Shrimp Truck one day after raving about their awesome Shrimp Scampi. This cousin of ours is a great cook. So when she tried their famous shrimp scampi, she immediately knew how to make it. So she gave me some pointers on how to make it. When we returned to the mainland, I decided to try it out and this recipe was born. And I've been making it ever since. It tastes almost as good as Giovanni's.

1 lb. raw shrimp (either peeled or shell intact)
2 tsp. garlic powder
1 tsp. salt
6-8 cloves garlic, minced
3 Tbsp. butter
1 Tbsp. vegetable oil

1) Combine shrimp, garlic powder, and salt in a freezer storage bag. Massage the seasoning into the shrimp. Marinate in the refrigerator for at least 1 hour.

2) In a large saute pan, melt together butter and vegetable oil. Add minced garlic and cook until fragrant but not browned. Stir in the marinated shrimp. Continue stirring and cooking until shrimp is pink. Do not overcook shrimp. Serve on top of white steam rice and a wedge of lemon for garnish.

Monday, October 10, 2011

The Battle of the Shave Ice: Matsumoto's vs. Aoki's

Whenever we're in Oahu, we always make it a point to visit Matsumoto's for their famous Shave Ice. Shave ice is a common thing to have in Hawaii. And Matsumoto's is so popular that they always have a long line forming out the door. For this trip, my brother suggested we give another Shave Ice shop a try, Aoki's, which is ironically right next door to Matsumoto's. So I had this brilliant idea to give BOTH a try to see who had the best Shave ice.

First we went to what we were familiar with. Matsumoto's. The line was long, but the service was pretty quick. You can order a plain shave ice, or shave ice with ice cream, or shave ice with Azuki beans (sweet Japanese beans), or shave ice with ice cream and Azuki beans. Then you decide what flavors you want for your shave ice.

My daughter asked for a plain shave ice with blueberry and pineapple flavors. Hubby and I shared the Hawaiian Special (pineapple, coconut, and banana) with ice cream and topped with condensed milk. We enjoyed our shave ice on the benches outside the shop.
Adding the condensed milk and ice cream made our shave ice so creamy and full of flavor. I think shave ice tastes best with them. So yummy. Unfortunately, my daughter dropped her shave ice. But they were kind enough to replace hers for free. I guess this must happen a lot. After enjoying our shave ice, we went back inside the shop and do some shopping. Hubby always buys a souvenir T-shirt from here, as well as gifts for some folks back home.

Next day, we decided to check out Aoki's. The line at Aoki's was equally long. They have a similar way of ordering: plain, with ice cream, with Azuki Beans or both. They also had a shop inside where they also sold souvenir t-shirts and other nick-knacks. But we opted out of those.

Hubby and I shared the Tropical flavors (which I forgot what flavors they were) with ice cream and topped with Li Hing Mui (the sweet and salty flavoring found in a dried salted plum). The Li Hing Mui gave a great balance to the sweetness of the ice cream and shave ice.

Our daughter asked for a plain cherry flavor. 'Nuff said.

The verdict: Though the flavors were both equally good, it all came down to the texture of the ice. Operating for 60 years, Matsumoto's really knows how to shave their ice. Maybe its the old machine that they've used for 60 years. But their ice is so much finer than Aoki's. There really is a difference. Matsumoto's ice literally melts in your mouth. Aoki's tends to have the crunch factor in theirs.

One might say that Matsumoto's is where all the tourists go to, so they go to Aoki's. Others just like Matsumoto's for the mere quality of the ice. I guess its a matter of preference. But whatever choice you make, make sure to eat your shave ice with a holder. Its the best advice anyone can give whenever eating shave ice. Its the best 50 cent investment you'll make :)

Sunday, October 9, 2011

Ted's Bakery


In the 8 years that I've been going and back and forth to Hawaii, I have always wanted to go to Ted's Bakery. I first heard about Ted's from an old co-worker of mine who raved about their haupia pie. She said you have to get to Ted's early in the day, or else they run out of the haupia pie. Okay, well what's haupia, I first thought. I came to learn, from one of the luaus we went to a few years ago, that its a coconut custard-like Hawaiian dessert. Not a huge fan of it, but when in Hawaii you gotta try it at least once. So, I had to try Ted's haupia pie at least once. However, we always seem to miss their shop when we drive up in the North Shore.

On this short trip, since we were staying in the North Shore, we had a chance to finally explore this part of the island and stopped by the famous Ted's Bakery for some lunch. Its pretty easy to miss this "mom & pop" shop because it has a small, hard-to-see store-front. But it was only a few blocks from the famous Sunset Beach.

As you enter this old school shop, you can't help but think that you just stepped into a liquor store. The interior was as drab as a corner liquor store. But when you look to the left of the store, you'll see a refrigerated case where they displayed their desserts. It was as if a ray of sunshine shined over this area.

Because our stay in Oahu was brief, we didn't want to buy a whole pie. But we did want to try as many varieties as possible. So we decided to pick up slices of a couple of pies. Then we proceeded to the counter to order our lunch. We ordered Ted's Bento, which consisted of fried chicken, fried mahi-mahi, teriyaki beef, a slice of spam and a few scoops of rice. Delicious. And huge. Enough to share. Which is what we did.

We also decided to order another plate lunch to eat for dinner later in the day. So we ordered the Combination #2, which included BBQ short rib, BBQ chicken, and breaded shrimp. This plate was equally delicious and huge.

Because we were full from both meals, we didn't get a chance to taste the slices of pie we bought until the next day. We ended up buying a slice of the Pineapple Macadamia nut cheesecake and their famous Chocolate Haupia Cream Pie.

The Pineapple Macadamia Nut cheesecake was pretty good, but my unexpected favorite was the Chocolate Haupia Cream Pie. Its a chocolate cream pie, with a hint of coconut flavor from the Haupia. It was a great flavor combination and pure genius.

I'm so glad we were finally able to find Ted's and stop by to try some of their specialties. Can't wait to stop by here again. Now that we know where it is.

Thursday, October 6, 2011

Liliha Bakery

*cue the theme song to Hawaii Five-0*

We recently got into watching the newer series of Hawaii Five-0 and absolutely love it. Maybe it was because it somehow takes us back to the islands. They feature a lot of the scenery we're quite familiar with around the islands. Specifically in Oahu.

On one episode, Chin Ho and Danno were eating some Coco Puffs from Liliha bakery. The scene featured their famous grey carrier box full of cream puffs, and Danno devoured them and raved about them. We had to have some of that. So off we went in search of Liliha bakery.
I expected the place to be packed. There were a few people, but service was pretty quick. So I was pleasantly surprised. As you walk into the shop, you'll notice that it isn't just a bakery. They also had a coffee shop serving, what else? Plate lunches. But we weren't there for a plate lunch. We were there for these babies:

Four different varieties of cream puffs: regular cream puff, chocolate cream puff, green tea cream puff, and their famous coco puff. I ordered 3 of each to make a dozen. And they all came in their signature grey carrier box as seen on Hawaii Five-0.

Hubby also asked for the haupia stuffed malasada which was quite yummy.

Not long after we got back to the car, I opened up the box and had one of each.

Danno was so dead-on about these. And thank you, Chin Ho, for introducing these to him. Because they were to die for. My favorite was the green tea cream puff: green tea custard filling with a green tea topping. The "tea-ness" didn't overpower the cream puff at all. And the topping had a slight saltiness that balances out the sweetness in the custard so well. My next favorite was the coco puff, which had a chocolate custard filling and a creamy butter topping. So yummy!

As we walked out of the bakery that day, we encountered their freezer that displayed frozen specialty items. Perfect to take home to eat later. They had frozen pancake batter, various cakes, and of course their famous cream puffs. I wish I had found the freezer sooner, before we ordered. I would have packed them to take back to the mainland. But I didn't want to get back in the long line. Now I'm going to regret that decision until my next trip back to Oahu. Liliha bakery, I'll definitely be back

Wednesday, October 5, 2011

Rainbow Drive-In

A plate lunch is the quintessential Hawaiian meal. Its a plate with a little bit of this, and a little bit of that. And if you're in Oahu, specifically in Waikiki, Rainbow Drive-In is the place to get your plate lunch fix. My brother raves about this place, and it was also featured on Diners, Drive-ins, and Dives on the Food Network. So during our quick trip to Oahu, we had to make the drive and brave the traffic in Honolulu to try Rainbow Drive-In.


In business for 50 years, their philosophy has always been hearty portions of great food, at a reasonable price for the working class. This still stands true and I can certainly attest to that when we ordered our food at the walk-up counter in Kapahulu. We ordered our food and it came out in quick minutes. I think it took longer trying to figure what to order, than when we actually got our food after we ordered. But hey, we weren't complaining.

I love beef BBQ served Hawaiian style, so I ordered the BBQ Steak, served with 2 scoops of rice and a side of macaroni salad. The beef was so tender and macaroni salad creamy. This was definitely ono kine grinds.

Known for their Loco Moco, hubby decided to order this specialty. A Loco Moco is a hamburger steak on top of 2 scoops of rice, all dredged in their house gravy and topped with eggs over-easy. I've had other versions of Loco Moco before, where the gravy used is the typical brown gravy. Rainbow's version was almost like a chili flavor with a slight sweetness. I guess its an acquired taste, because hubby loved it and I wasn't huge fan of it. I stuck to my BBQ steak.

Our daughter is not a big meat eater yet, so we had to pick something up for her. On the day we we visited Rainbow's, their special for the day was Spaghetti with wiener. Sounds like Filipino spaghetti to me, where the spaghetti sauce is slightly sweet and always has slices of hot dogs. This shows how big of an influence Filipino cuisine was to Hawaiian cuisine. Well, unfortunately, they ran out of the spaghetti, and so we ordered the next best thing. Saimin, which is basically Ramen.

The authentic Japanese Ramen, I've had the pleasure of eating and enjoying. Other Saimin dishes, I've also had, which were pretty good. Rainbow's, however, was pretty disappointing. It tasted more like it came from a packet. You know the one. The instant Ramen. Yeah, I guess they put more effort into their plate lunches. Luckily, our daughter can't tell the difference between instant ramen and a good ramen yet. And she needed to eat. No complaints from her.

I look forward to returning to Rainbow Drive-in someday, if only for their BBQ plate.

Tuesday, October 4, 2011

The Gathering Place, Oahu


After 3 days on the beautiful island of Maui, we continued with our Hawaiian vacation and headed off to Oahu, the Gathering Place. I don't exactly know why this island is called "the Gathering place." Maybe because anyone traveling to the islands first land at Honolulu, Hawaii's capital. And many probably end up residing in Oahu, which is why it is the most populated island in Hawaii. But being that it is the most populated, makes it the island to visit whenever its your first time in Hawaii. There's lots to do on this island. And because there's lots to do, you'll encounter more tourists.


Its been about 6 years since our last trip to Oahu. But whenever we visit, we always stay at a hotel in Waikiki. On the beach, of course. But on this trip, we wanted to have a laid back kind of vacation. Away from all the crowds and tourists. So we decided to rent a beach house on the North Shore of the island.

Our beach house was located on the beach in the quiet town of Waialua. And we had the beach all to ourselves, with occasional people passing by for a walk.
(our own private beach)

The beach house had all the comforts of home. So I was able to cook breakfast every morning and saved money on food. A nice change of pace, since everything is a little pricey in Hawaii. Every morning, I cooked a typical Hawaiian breakfast consisting of rice, scrambled eggs, and Portuguese sausage or Spam.

And we always ate our breakfast (and all other meals) next to the bay window in the living room to have this beautiful view:
(this is also the view in our room)

Typical visitors we had at the beach throughout the day was a family of sea turtles that swim pretty close to the shore where you can practically swim with them. I don't swim well in the ocean, so I kept a safe distance.

The thing to do in Oahu is visit the pineapple plantation at Dole.

When there, we always swing by the shop and pick up their famous Dole Whip. Our daughter had a sample of their sweet pineapple after we took the train ride around the plantation, so we decided to pick up some fresh cut pineapples at the shop as well.

A common pupu (or appetizer) in a Hawaiian meal is poke (poh-keh). Its chopped up pieces of ahi tuna with seasonings. It tastes best when served with taro or sweet potato chips. We visited a local supermarket when we took a trip to Waikiki one day and found a service counter dedicated to poke. So hubby and I decided to pick up a couple of different versions of poke and a bag of taro chips. I ordered the avocado poke that was super ono. It had a mild spice and the creaminess from the avocado. I'm gonna definitely try to replicate this.

Hubby ordered the the plain poke which he said tasted too plain. He liked my poke better.

Where we stayed in the North Shore, food trucks are pretty common. I guess you can say that Oahu was the first in the food truck movement. Shrimp trucks is the thing to do up in the North Shore. And the most famous one is Giovanni's Shrimp Truck.
You can't visit the North Shore without having some Giovanni's. So we decided to pick some up on our last day in Oahu.

Their most popular dish is their Shrimp Scampi. Its a plate of their sweet and succulent shrimp, heavily seasoned with butter and garlic, then served with 2 scoops of rice and a wedge of lemon. I could eat this meal everyday. It was that good. It was bomb dot com.

We were able to visit many other places in Oahu, which I will feature in the next couple of posts. This post was just about random things in Oahu. We definitely enjoyed our own private beach. And we'll definitely miss seeing this everyday:
I wish I could take this with me. Aloha. A hui hou (until we meet again).