Monday, June 28, 2010

Brown Sugar cupcake


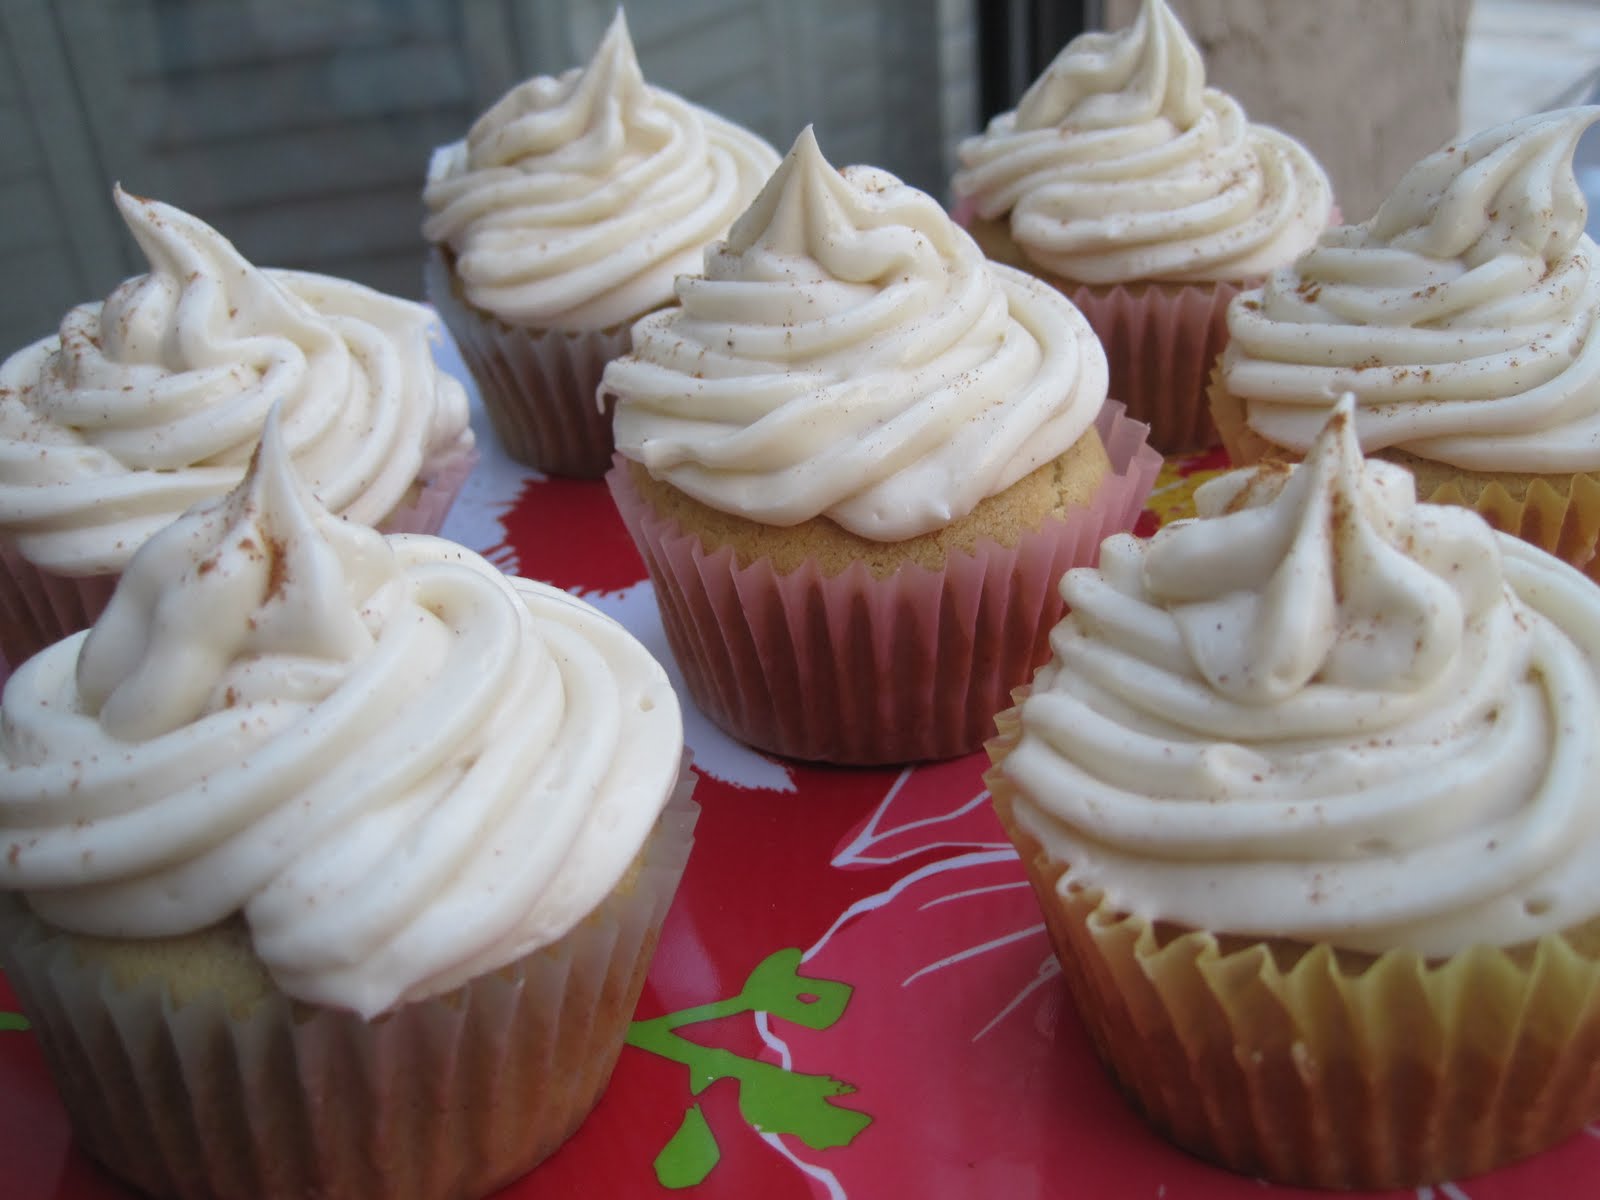
I love buying my favorite, Brown Sugar Cinnamon cupcake, from my favorite cupcake store, Yummy Cupcakes. So I was really excited to find this recipe from one of my favorite blogs, Tiny Tyrant's Kitchen. I've bookmarked this recipe for a while now and I wanted to give it a try, in the thoughts of hopefully making it for our 4th of July Tailgate this coming weekend. I guess this was my trial run. I topped this cupcake with the Brown Sugar Cream Cheese frosting from her Red Velvet cupcake recipe. I modified the frosting by adding cinnamon, though I know she also has a Cinnamon Cream cheese frosting.

Anyway, the overall cupcake was delicious. One problem I had was that I didn't know how to decorate. I bought some plastic frosting tips at the supermarket and used a plastic sandwich bag to pipe in the frosting. That was messy. So I decided to use the good 'ol fashion knife to spread the frosting. Another problem I encountered was the fact that the weather was a little warm, which made the frosting a little too soft. So I had to refrigerate the frosting every now and then so that it would firm up. When I tried making this again, I finally bought the right piping bags and frosting tips and it made such a big difference. My cupcakes not only tasted yummy, but it looked so good too!

Cupcake
1 1/2 sticks butter, softened
3/4 cup light brown sugar
2 eggs
1 1/3 cup flour
1/2 tsp. baking powder
1/2 tsp. baking soda
1/8 tsp. salt
1/2 cup milk
1 tsp. vanilla extract
1/4 tsp. cinnamon

Frosting
1 stick butter, at room temperature
8 0z package cream cheese, at room temperature
1/4 cup light brown sugar
1/4 tsp. cinnamon
pinch of salt
4 cups powdered sugar
2-4 Tbsp. milk

1) Preheat oven to 350 deg. F. Line muffin tin with muffin cups.

2) In a medium bowl, whisk together flour, baking powder, baking sugar and salt. Set aside. Measure out milk and vanilla extract. Set aside

3) In a large bowl, beat together butter and brown sugar until light and fluffy, about 1-2 minutes. Add eggs and beat well.

4) Add 1/3 of the flour mixture into butter mixture and beat to combine. Alternately add milk then flour mixture and beat well. Pour batter in prepared muffin cups using an ice cream scoop. Bake for 15-18 minutes until golden brown and toothpick test comes out clean. Cool completely.

5) To make the frosting: Whip together butter and cream cheese until fluffy. Add brown sugar, vanilla, cinnamon and salt and continue to mix until well blended. Add powdered sugar a little at a time until well incorporated. If mixture is a little too stiff, add milk, one tablespoon at a time to achieve desired consistency. Spread over cooled cupcakes. Sprinkle a little cinnamon on top.


Sunday, June 27, 2010

Cilantro Pepita dressing (Mexican Caesar Salad dressing)


After making my Tequila Lime Chicken and adding it to a salad, we used a store-bought Thousand Island dressing, which was all we had in the fridge. It tasted okay. But I thought to myself that a creamy cilantro dressing would go great with this salad. So after searching online for a cilantro dressing, I found this awesome recipe on CDKitchen. It turns out, this was also the recipe for El Torito's Mexican Caesar Salad dressing, which I had when we last visited there with my office. SCORE! That visit to El Torito left me with a very lasting impression. From there, I was inspired to learn how to make my Chile Verde. Now I learned to make their salad dressing.

I had to go to 2 different stores to buy all the ingredients for this dressing. They don't normally sell Pepita (or shelled Pumpkin seeds) at the grocery store, so I went to a local Mediterranean market to buy some. Going to the Mediterranean market is always an adventure for me because I find a lot of unique ingredients not normally found at the regular grocery store.

Anyway, this dressing was delicious! Very flavorful. My next conquest from the El Torito menu will probably be their sweet corn cake. We'll see how that goes. Hubby loved this one and said it was restaurant quality. So this will definitely make it on my regular rotation.

2 medium Anaheim chiles, roasted, peeled and seeded
1/3 cup roasted pumpkin seeds
2 garlic cloves, peeled
1/4 tsp. black pepper
1 tsp. salt
1 1/2 cup oil (olive or vegetable)
1/4 cup red wine vinegar
5 Tbsp. Cotija cheese
2 small bunches of cilantro, stemmed
1 1/2 cup mayonnaise
1/4 cup water

1) In a blender or food processor, place all the ingredients except cilantro, mayonnaise and water. Blend for 10-15 seconds. Add cilantro a little at a time until blended smooth. Set aside.

2) In a stainless steel bowl, whisk together mayonnaise and water until smooth. Add the cilantro mixture into mayonnaise mixture and mix until well incorporated. Place in an airtight container and refrigerate until ready to use. Dressing will keep for about 3 days. Serve with chopped romaine lettuce, tomatoes, corn, avocado, crushed tortilla chips and crumbled cotija cheese.


Thursday, June 24, 2010

Tequila Lime Chicken


I decided that today was the day I'd break my Thai food streak and try something new. I had printed this recipe off the internet and had been saving this for quite some time and decided to do some grilling for dinner tonight.

Man oh man was this good. It reminds me of the chicken I would order at Baja Fresh or something. You can make this with chicken wings for a nice appetizer or boneless skinless chicken that you can cut up to use in a salad (which is what I made for hubby's lunch for tomorrow as pictured below) or in tacos/fajitas. Either way you make it, it'll definitely be delicious and flavorful.


4-5 lbs. chicken (boneless/skinless or chicken wings)
1/4 cup tequila
1/4 cup lime juice
1/4 cup honey
1 jalapeno pepper (more if you like it spicy)
3 cloves garlic, minced
1 Tbsp. chili powder
2 tsp. ground cumin
1/4 cup cilantro, roughly chopped
1 tsp. salt

1) Combine all ingredients, except chicken, in a large ziploc freezer bag. Shake to fully incorporate. Add chicken and shake together, making sure to distribute the marinade over the chicken. Refrigerate for 1 hour.

2) Preheat grill to medium heat. While grill heats up, let chicken stand at room temperature for 15 minutes. Grease the grill with cooking spray or oil to prevent from sticking. Place chicken on grill and cook on each side for 5-7 minutes. (note: if chicken is sticking to grill when you turn it the first time, it probably isn't ready, so give another minute or so). Remove from heat and let stand for 10 minutes before serving.


Tuesday, June 22, 2010

Thai Stir Fried Beef in Oyster Sauce


I'm definitely in a Thai food kick. This is recipe #4 from my Thai cookbook. I had bookmarked this recipe last week and decided to make it today for dinner. This recipe was quite simple to make and very flavorful. It calls for different kinds of Asian mushrooms that I've never cooked with before (but loved it in Chinese dishes when we eat out). I love mushrooms so I was excited to find them at my local Filipino store. They only had the straw mushroom, so its all I used in this dish. The meat was a little tougher than I'd like it to be. But all my Asian beef dishes are. I still have to find out what the secret is to making tender beef for making Asian dishes like Beef and Brocolli and this Beef in Oyster Sauce. This dish was otherwise quite good and easy to whip up.

1 lb. beef round steak, cut into strips
1 Tbsp. cornstarch
2 Tbsp. soy sauce
3 Tbsp. oil
1 Tbsp. chopped garlic
1 Tbsp. chopped ginger
3 cups mixed mushrooms (such as straw, shitaake, or oyster mushrooms)
2 Tbsp. oyster sauce
1/2 tsp. sugar
black pepper to taste
4 spring onions, sliced
1-2 Thai Chili, sliced (optional)


1) In a medium bowl, combine cornstarch and soy sauce and stir until well incorporated. Add beef strips and mix well. Marinate for at least 30 minutes.

2) Heat 1 1/2 Tbsp. oil in a wok or large frying pan on medium-high heat. Add garlic and ginger and cook until it becomes fragrant. Add marinated beef, stirring frequently to separate the pieces. Cook until all sides of beef is browned. Remove from heat.

3) In the same pan, heat the remaining oil. Add mushrooms and cook for about 1 minute. Add oyster sauce, black pepper and sugar and stir until well incorporated. Add cooked beef and spring onions. Cook for another 2-3 minutes. Serve on a platter, topped with Thai chilli, if using.

Friday, June 18, 2010

Spicy Thai Fried Noodles


This is another recipe from my Thai cookbook that looked good. I didn't feel like cooking tonight and this recipe looked pretty simple. It seemed like all I had to do was toss things together. So I wanted to give it a shot.

One thing I learned about Thai cooking is that the food has to be cooked quickly, which means all your ingredients need to be ready to throw in the pan or wok. With this recipe, I thought I could get away with getting the ingredients ready (by cutting, measuring, etc.) during the middle of the cooking process. Well, doing that resulted in my noodles being slightly overcooked and burning at the bottom of the hot wok. So I've learned to make sure I have all the ingredients on hand, ready to cook.

A good thing about this recipe is that its pretty versatile with whatever kind of meat you have. You can use pork, chicken, shrimp, or a combination of all. I happened to only have chicken and shrimp. It came out pretty good, otherwise. But its not the typical Thai flavors I'm accustomed to. So I'm not sure if I'll be making this for my regular rotation. Maybe if I have a taste for it again, I'll make it.

8 oz egg noodles
4 Tbsp. oil
2 cloves garlic, finely chopped
2 boneless, skinless chicken, cut into cubes
1 cup shrimp, peeled and deveined
3 Tbsp. fresh lemon juice
3 Tbsp. fish sauce
2 Tbsp. light brown sugar
2 eggs, beaten
1/2 fresh red chili, seeded and finely chopped
2/3 cup bean sprouts
4 Tbsp. roasted peanuts, chopped
3 green onions, chopped
3 Tbsp. chopped fresh cilantro

1) Boil a large pan of water. Add noodles, remove from heat and leave for 5 minutes. Drain and set aside.

2) In a wok or large pan, heat oil. Add garlic and cook for about 30 seconds. Add chicken and cook until lightly brown. Add shrimp and cook for about 2 minutes, until shrimp is pink.

3) Add lemon juice, fish sauce and sugar. Stir until sugar is dissolved. Add noodles and stir fry until well combined.

4) Pour beaten eggs over noodles and stir fry until eggs are set. Add chili and bean sprouts. Add a half of the portion of peanuts, green onions and cilantro and stir fry until well incorporated. Set on a serving platter. Top with remaining peanuts, green onions and cilantro and serve immediately.


Thursday, June 17, 2010

Chicken Satay with Peanut sauce


Hubby introduced me to Thai food from our now-favorite Thai restaurant, Original Thai BBQ, when we first started dating almost 15 years ago. Not only did I fall in love with him, but I also fell in love with Thai food. Especially Satay. Whenever we order from them, we almost always order the same thing: S1 (BBQ Chicken plate), S8 (Beef or Chicken Satay plate), and Pad Thai or Pad See Ewe. I've learned how to make almost half of these items and so I was happy to find this easy Satay recipe in my Thai cookbook.

I knew I made a huge mistake by not using this awesome cookbook sooner. I've been on a Thai food kick lately since re-discovering this cookbook. And tonight, I was craving Satay. This turned out deliciously and hubby actually compared it to our favorite S8 plate. He says he felt like he was eating an S8 plate.

4 skinless boneless chicken
2 cloves garlic, crushed
1 inch piece ginger root, finely grated
2 tsp. fish sauce
2 Tbsp. light soy sauce
1 Tbsp. honey
16 wooden skewers
Peanut sauce (recipe below)

1) Cut chicken into long strips. Place in a large bowl. In a small bowl, combine garlic, ginger, fish sauce, soy sauce and honey until well incorporated. Pour over chicken and mix well. Cover and refrigerate for 30 minutes. While marinating, soak skewers in water (this will help so the sticks will not burn on the grill)

2) Thread chicken strips on skewers. Grill for 3 minutes on each side or until golden brown and cooked through. Serve immediately with Peanut sauce.

Peanut sauce
6 Tbsp. crunchy peanut butter
1 fresh thai chili, seeded and finely chopped
juice of 1 lime
1/4 cup coconut milk
salt to taste

Combine all ingredients in a food processor or blender and puree until smooth. Adjust taste by adding more salt or lime juice.


Monday, June 14, 2010

Cheeseburger bread


I found this recipe from another blog I visited, Telly's Tasty Tidbits, that I wanted to try out. I made my stuffed burger for lunch yesterday, but I guess I used the wrong hamburger patties so it didn't taste quite as good as I had first made it. To redeem myself to hubby, I wanted to make up for it by trying this recipe.

This came out really good. It reminds me of an empanada with a softer dough. The original recipe called for bacon, but I didn't have it on hand, so it was omitted from this recipe. Hubby and daughter liked it. I'll definitely be making this again as a quick meal.

1 lb pizza dough (which equals to about 2 tubes of refrigerated pizza dough)
3/4 cup ground beef (or ground turkey)
a few dashes of Worcestershire sauce
1/4 cup finely chopped onion
1 cup shredded cheddar cheese
1/4 cup chopped tomatoes
2 Tbsp. pickled relish
salt & pepper to taste

1) Preheat oven to 400 deg. F.

2) In a large skillet, cook ground meat with a few dashes of Worcestershire sauce over medium heat until meat is cooked through. Add the tomatoes and continue cooking for about 1 minute. Drain and remove to a large bowl.

3) In the same skillet, add onions and cook until softened, about 5 minutes. Add to bowl with meat mixture. Add pickled relish, cheese, and salt & pepper to taste. Mix until well incorporated.

4) Roll dough into a large rectangle and cover with meat mixture. Roll dough (starting with the long side) to make a loaf, pinching seams together. Bake, seam-side down, on a baking sheet for 15-20 minutes or until golden brown. Allow to sit for 10 minutes before slicing.

Sunday, June 13, 2010

Thai Fried Rice


I've been making Thai Fried Rice for a while. I had a Thai friend tell me how to make it once a long time ago - throw in some of this and some of that and Voila! I never really had a recipe, but it always comes out really good. I was thumbing through my Thai cookbook, Thai Food and Cooking - one that I hardly open, though I don't know why - and, to my surprise, actually found a recipe. Its almost exactly the same way I used to make it.

Making fried rice is really easy. I decided to make some for dinner tonight because I didn't want to really slave over the stove and wanted to make something quick. What's really great about this recipe is that you can practically use whatever ingredients you have on hand. Just make sure you have the basic seasonings - fish sauce, soy sauce, sugar. My daughter loved this because it had rice and egg, her favorite combination. This was a whole meal in itself, so hubby and I were quite satisfied with this simple dinner.

3 Tbsp. oil
1 small onion, sliced
1 Tbsp. chopped garlic
4 oz chicken (or pork, beef, or shrimp) cut into small cubes
2 eggs, beaten
4 cups cooked rice
2 Tbsp. fish sauce
1 Tbsp. soy sauce
1/2 tsp. suar
4 green onions, finely sliced (for garnish)
sliced limes (for garnish)
sliced cucumbers (for garnish)

1) Heat oil in a wok or large frying pan. Add onions and garlic and cook for about 2 minutes until softened.

2) Add meat and stir fry until met is cooked through. Add eggs and cook until scrambled into small lumps.

3) Add rice and continue to stir and toss to coat with oil and prevent it from sticking together. Add fish sauce, soy sauce and sugar. Mix well and cook until rice is thoroughly heated.

4) Place rice in a serving platter and garnish with green onions, cucumbers and sliced limes.


Strawberry Cheesecake Ice Cream


I've been wanting to make a strawberry cheesecake ice cream for a long time. I tried making one before, and I believe it was a Tyler Florence recipe using eggs. I mistakenly added the cheesecake chunks during the churning process and it was a disaster. So I vowed never to make ice cream with eggs and learned that I should add the mix-ins after the churning. I always like searching for ice cream recipes that didn't require eggs and so I found this recipe in one of my favorite blogs, Sing for your supper.

Strawberry season is in full swing, so I've been crazy with strawberries lately and decided to try to make this. I've doctored the recipe a little bit and used heavy cream instead of half & half because its all I had. I also added cheesecake cubes in the mixture to give it an extra surprise. I just love the extra bite of cheesecake in the ice cream. This came out super rich and yummy. A definite make-again recipe.

1 package (8 oz) cream cheese, cut into small cubes
zest of 1 lemon
1 cup sour cream
1/2 cup heavy cream
2/3 cup sugar
pinch of salt
strawberry sauce (I used my homemade Strawberry Jam)
prepared frozen cheesecake, cut into small cubes

1) Place all ingredients, except strawberry sauce and frozen cheesecake, in blender. Puree until smooth. Refrigerate mixture for about an hour.

2) Place chilled mixture in ice cream maker container and freeze according to the manufacturer's instructions.

3) Remove container from ice cream machine. Fold in desired amount of cheesecake cubes in the ice cream mixture. Once folded in, place half of the ice cream mixture in a container. Drizzle strawberry sauce on top. Repeat layers. Swirl a knife into mixture to create a marble effect. Freeze for 3-4 hours before serving.

Saturday, June 12, 2010

Cheesecake-stuffed Strawberries


I first saw these awesome little desserts on the Food Network a while ago. Strawberries are in season right now, and I found some really nice looking ones at the local Farmer's Market, so I thought to try to replicate them and got the idea from Tiny Tyrant's Kitchen. These were super easy to make and delicious. This is not one to pass up. You can use prepared cheesecake, but I made some from the Jell-O no bake Cheesecake mix because it was easier to stuff in the berries.

1 lb. fresh strawberries
prepared cheesecake or Jell-O no bake Cheesecake mix
crushed Graham Crackers

1) Remove stem of strawberries and hollow out the berry from the top to its center (I used a melon baller). Set aside.

2) If using prepared cheesecake, scoop out cheesecake filling and stuff in the berries.
If using the Jell-O mix, prepare the filling according to the package. Once the filling has thickened, place filling in a piping bag or ziploc bag with the tip cut out. Pipe into the berries.

3) Roll the top of the berries with the filling on the crushed graham crackers and place on a platter. Chill for 1-2 hours to harden the filling.


Thursday, June 10, 2010

Salsa Verde Sour Cream Enchiladas


My daughter and I are house/dog sitting for my parents for the next 4 days because they're in Hawaii with my siblings. Hubby drops us off at their house in the morning before he goes to work, and then comes back for us after work. We have dinner, then we head home. Although I used to live in this house, its just feels weird cooking outside of my own kitchen. I don't know where everything is kept anymore.

Today's dinner was planned last night. Meaning I packed my own ingredients to make at my parents house. I found this recipe from another blog I visit, Sing for your supper. This dish was really yummy. Hubby says its restaurant quality. It was pretty easy to make. I used store-bought rotisserie chicken to eliminate the cooking process of the chicken. I also omitted the Jalapeno that it calls for because I didn't want it to be too spicy for my daughter. This is another great make-ahead-meal.

4 boneless chicken breasts, cooked and shredded (or use store-bought rotisserie chicken)
2 Tbsp. butter
3 large cloves of garlic, minced
1/2 medium onion, diced
1 Jalapeno, seeded and minced (optional)
2 Tbsp. all-purpose flour
2 cups chicken broth
2 cups sour cream
16 oz jar Medium Salsa Verde
1 1/2 tsp. cumin
1/4 tsp. cayenne pepper
1/2 tsp. salt
1/4 tsp. white pepper (I used black pepper, its all I have)
1/2 tsp. garlic powder
1/4 cup cilantro, chopped
10-12 flour tortillas, small fajita size
1 cup shredded cheddar cheese
1 cup shredded Monterey Jack cheese

1) Preheat oven to 350 deg F. Melt butter over medium-high heat. Saute onions (and Jalapenos if using) until soft. Add garlic and cook for 1 minute. Stir in flour and let cook 1-2 minutes. Whisk in chicken broth until smooth and let cook until bubbly.

2) Stir in sour cream, salsa, cumin, cayenne pepper, salt, pepper, garlic powder and cilantro until sauce is smooth. Remove from heat.

3) Grease a 9x13 baking dish. Add 1 cup of sauce to the bottom of the pan. Place chicken and cheese on center of each tortilla and roll, placing seam-side down in the dish. Pour sauce over the enchiladas. Top with leftover cheese and bake for 25 minutes or until top is brown and bubbling.


Tuesday, June 8, 2010

Summer Corn Dip


I found this recipe at one of the blogs I visited and thought to make it today. I still had a few ears of corn leftover from last week, so I thought it would be perfect to use on this. The original recipe called for canned Mexi-corn, which I obviously substituted. It came out quite good and hubby was addicted. He says I'm not much help to his diet. I say, everything is okay in moderation.

1/2 cup light sour cream
1/2 cup mayonnaise
2 cups fresh corn kernels
1 cup shredded cheddar cheese
1/4 cup green onions
1/4 cup red and green bell peppers, finely diced

Mix together all ingredients until well incorporated. Refrigerate for at least 1 hour. Serve with tortilla chips.


Monday, June 7, 2010

Chocolate Cake with Chocolate Cream Cheese frosting


Its my brother's birthday today. HAPPY BIRTHDAY, BRO! I decided to make a cake for his birthday instead of buying one to give me an excuse to try out this recipe I found. As far as I can remember, my brother always loved having chocolate cake for his birthday. My mom used to make chocolate cake (without frosting) from scratch and her potato salad for his birthday. She hasn't done that in a while. So I thought now would be a good time to bring back that tradition, minus the potato salad. The chocolate cake recipe is from Hershey's. We're taking him out to dinner tonight, so we'll probably be cutting this cake before we go out to dinner. Hope he likes it :)

Update: The cake came out really moist and flavorful. I got a thumbs up from the birthday boy. Which is a big deal, because he's very picky with his food. So I'll definitely be making this one again.

For the Cake
2 cups sugar
1 3/4 cups all-purpose flour
3/4 cup cocoa powder
1 1/2 tsp. baking powder
1 1/2 tsp. baking soda
1 tsp. salt
2 eggs
1 cup milk
2 eggs
1/2 cup oil
2 tsp. vanilla extract
1 cup boiling water

1) Preheat oven to 350 degrees F. Grease and flour 2 9-inch round baking pans.

2) In a bowl, mix together sugar, flour, cocoa powder, baking powder, baking soda, and salt. Add eggs, milk, oil and vanilla. Beat on medium for about 2 minutes. Pour in boiling water and continue to mix until well incorporated. Batter will be thin. Evenly distribute batter between the two prepared pans.

3) Bake for 30-35 minutes or until wooden pick comes out clean. Start checking cakes around 25 minutes as oven temperatures may vary.

4) Cool in pans for 10 minutes, then run knife around the edges and gently remove from pans. Place on wire racks to cool completely.

For the frosting
1 (8 oz) package cream cheese at room temperature
1/4 cup butter (1/2 stick) at room temperature
3 cups sifted powdered sugar
1/3 cup cocoa powder

1) Combine all ingredients in a large bowl. Beat on medium high speed until light and fluffy. Mixture will be thick like wet sand at first, but will eventually turn fluffy.

2) To frost cake, place first layer on your serving platter and frost top, leaving about an inch border. Place the second layer on top (bottom-side up) and frost the top and sides.


Sunday, June 6, 2010

Disneyland & California Adventure

Since hubby is out of school, we decided to make another trip to Disneyland to commemorate the end of his first year in his program. Also, its the weekend of my brother's birthday. So what better way to celebrate than to go to the Happiest Place on Earth.

We started our day early. Early, as in as-soon-as-it-opened early. We were able to go on rides that my daughter wasn't able to ride on the trip we made last December. We were also able to get on rides that we had already taken her to. Unfortunately, some of the rides she liked before scared her now. So she didn't enjoy much of the rides. But she did enjoy meeting more Disney characters on this trip.

We made it a point this time to visit Critter country and see Winnie the Pooh. We were lucky enough to see Pooh, Tigger and Eeyore. After the photo-ops, we ventured to the sweets shop there and bought some goodies.


After going to a few more rides, we headed back to the hotel to give my daughter a nap and re-energize. We then headed to California Adventure for a lunch date with Ariel and the other Princesses at Ariel's grotto. It had been a while since hubby and I had lunch here.

After meeting with Ariel as we entered the dining area, we were given an appetizer tower, consisting of fruits, cured meats, cheeses, salad, and bread.


For my main course, I had the redfish

My daughter had her usual Macaroni & Cheese

And finally, we were served with an array of desserts on a platter

The main course and appetizers served were "okay." Nothing to write home about. The desserts are always delicious. But I guess you pay for the ambience and experience of meeting with the princesses.

The following day, we decided to have breakfast again at Goofy's kitchen for some Mickey waffles.


This time, we were able to meet Jasmine and Alladin during our breakfast. I think we'll be making this a tradition every year. I hope so. Because its always fun to visit the Happiest Place on Earth and to have breakfast with some of the Disney characters.


Friday, June 4, 2010

Happy 1st Blogeversary to me

I can't believe its already been a year since I first started this blog. The original intent of me starting this blog was to keep track of my recipes. But its now evolved into so many things - from my love of cooking and trying out and creating new recipes, to adventures in eating different foods, to my newfound love of food photography. I never knew how much I've taken for granted the beauty you find in food. Food is not merely something you smell, taste and eat, but also to see.

I can also say that hubby, daughter, a few of my family members and co-workers have enjoyed these adventures with me. Whenever I make something new, I split the final product between hubby/daughter, my family, and then co-workers. Its been quite rewarding watching them eat my dishes and watching the expression on their faces as they enjoy the food. My toughest critic really is my daughter, as she is quite picky with her food. Many of my recipes revolve around her and its a challenge to figure out if its something she'll eat. For the most part, however, she's been able to eat the food I make.

To commemorate my blogeversary (aka anniversary), I've listed a few of my favorite recipes and culinary adventures this past year. I hope those of you who do read my blog have enjoyed these adventures as much as I have and thank you for taking part in this blog.

Korean BBQ Short Rib
Crockpot Korean BBQ-style soup
Stuffed Burger
Crockpot Ropa Vieja
Albondigas
Hot Cocoa
Good Old Fashioned Pancakes
Pumpkin Cake roll
"The Elvis"
Gooey Chocolate Brownie cookies
Red Velvet Cake bon-bons
Watermelon Sherbet
Tiramisu
Ina Garten's Outrageous Brownies
Cake Batter ice cream
Peach Cobbler
Monkey Munch
Crockpot Chicken Tortilla soup
Chicken and Shrimp Gumbo with Andoullie sausage
Cioppino
Chicken Tikka Masala
Vegetarian Samosas
Crockpot Chile Verde
Basil Pesto Pasta
Pasta Bolognese
Argentinian Chimichurri sauce
Creamed Corn
California Club pizza