Thursday, February 10, 2011

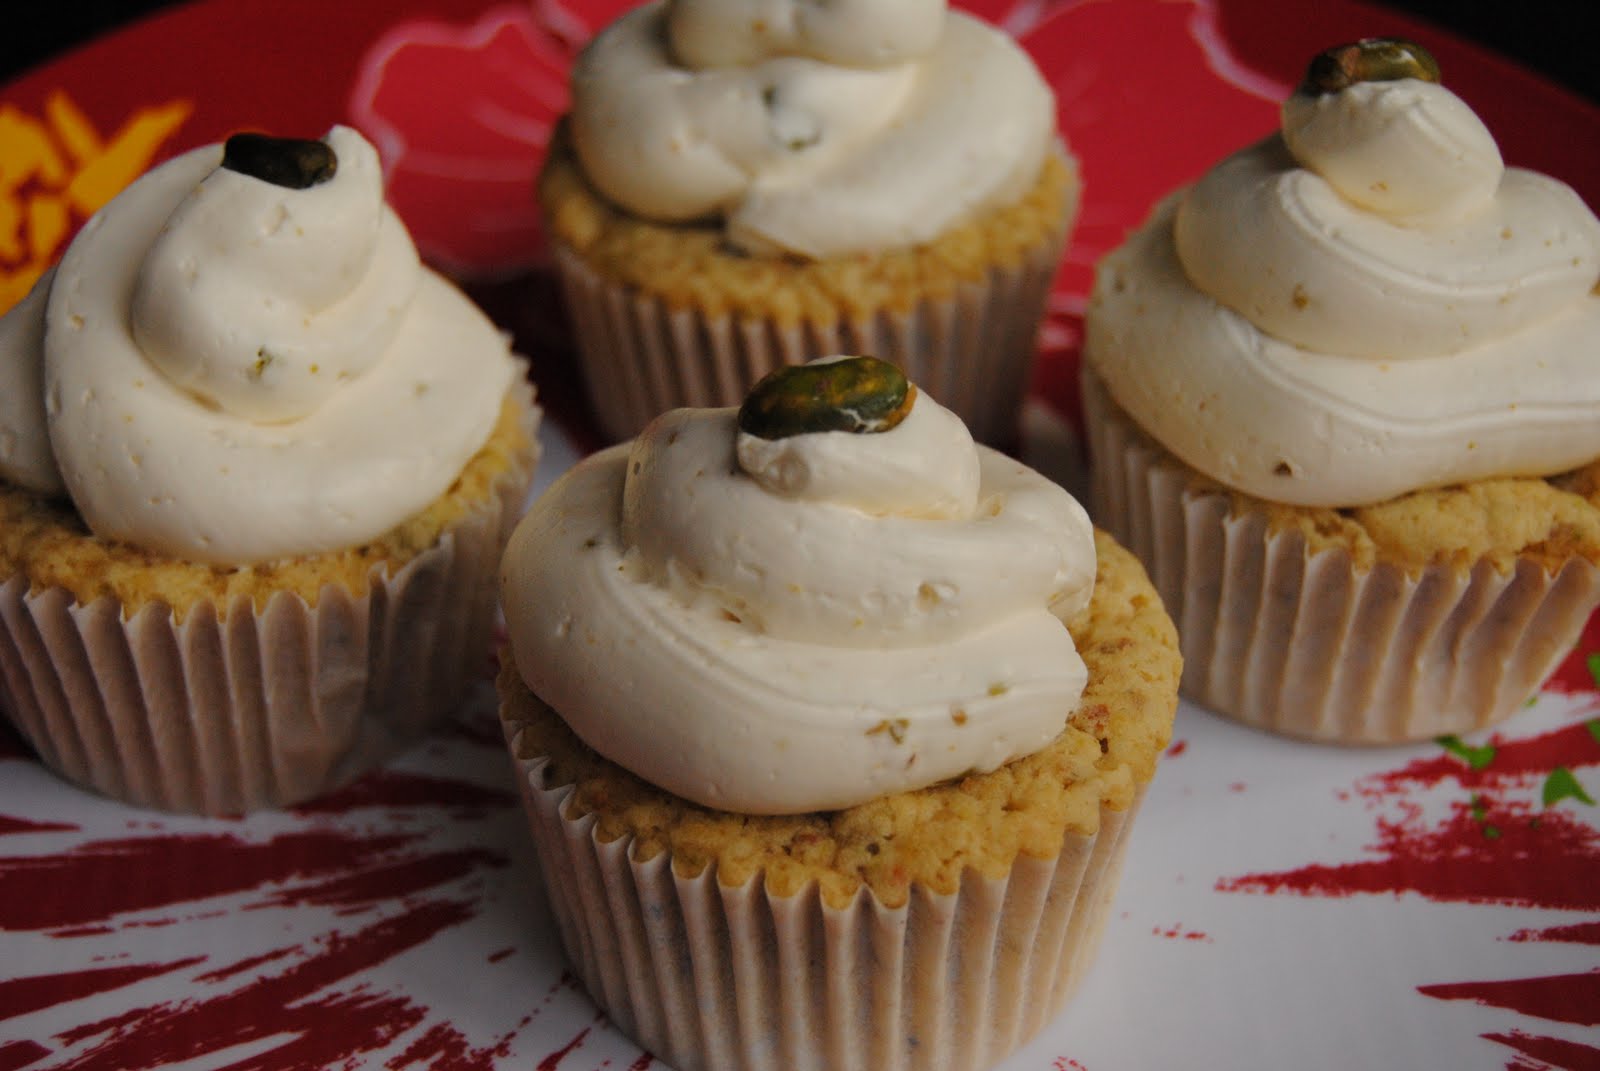
Pistachio Cupcakes


My mom's favorite is Pistachios. She'll eat anything that is Pistachio. Pistachio ice cream, cookies, chocolate, you name it. So when I found this recipe from Annie's Eats, I immediately thought to make this for my mom one day. I kept delaying trying to make this recipe, and when I had mentioned to my mom about these cupcakes last week, there was no backing out. I had to make these ASAP. And since we're going out of town this weekend with my parents, I figured I'd take some along for her.

The frosting I used for these cupcakes is a Pistachio and Vanilla Swiss Meringue Buttercream I found from a link that Annie included in her recipe. The original recipe is from Use Real Butter and it made a lot of frosting. I would probably reduce the ingredients to half to accommodate the 16-18 cupcakes this recipe makes. There were a lot of steps to making this recipe. But the cake came out really moist and flavorful and has a burst of pistachio flavor. I'm sure my mom will love these.

Cake
3/4 cup, plus 2 Tbsp., shelled pistachios
10 Tbsp. unsalted butter, at room temperature
3 oz cream cheese, at room temperature
1 1/2 cups sugar
3 large eggs
1 tsp. vanilla extract
1 1/2 cups all purpose flour
1 1/2 tsp. salt

1) Preheat oven to 325 deg F. Line cupcake pans with paper liners.

2) Place 1/2 cup pistachios in a food processor and process until finely grounded.

3) Combine butter, pistachios and cream cheese and beat on medium-high speed until light and fluffy, about 3 minutes. Gradually add sugar on medium-low speed, scraping the sides of the bowl as needed. Beat in eggs one at a time, mixing well after each addition. Blend in vanilla. With the mixer on low, slowly add flour and salt and mix just until dry ingredients are incorporated. Coarsely chop the remaining pistachios and fold into batter.

4) Divide batter in prepared pans, filling it up about 3/4 full. Bake, rotating halfway through baking, for about 30 minutes or until toothpick inserted comes out clean. Cool in pan for a few minutes, then place on wire rack to cool completely before frosting.

Pistachio & Vanilla Swiss Meringue Buttercream
8 oz egg whites
16 oz sugar
1 lb. (4 sticks) unsalted butter, at room temperature
2 tsp. vanilla extract
1 /2 cups shelled pistachios

1) Blanch pistachios in boiling water for 3 minutes. Drain and place pistachios on a cotton towel. Fold towel over and rub the pistachios vigorously to loosen and remove the skin. Toast the skinned pistachios for 15 minutes at 325 deg F. Remove from the oven and cool at room temperature. Finely chop 2/3 cup of the the pistachios.

2) Combine egg whites and sugar in a mixing bowl. Place in a double boiler until mixture reaches 140 deg F, whisking constantly. Remove from heat. Whip mixture with a balloon whisk on medium speed until stiff. Lower speed to the 3rd speed and continue whipping until cool to touch. Switch to a paddle and continue beating. Gradually add butter, 1 tablespoon at a time. Mix to emulsify. Once desired consistency is reached, add vanilla. Fold in chopped pistachios. Frost cooled cupcakes. Top cupcakes with the remaining pistachios for garnish.

Monday, February 7, 2011

Alfajores


Alfajores is an almond flavored sandwich cookie often found in Latin cultures. There are many different versions of this cookie from different parts of Latin America. This particular recipe is a Peruvian version. I came to learn about this delicious cookie from one of my co-workers when she brought some back from lunch at a local Peruvian restaurant. I was totally hooked and I had to find a recipe. I found this recipe from Christmas-cookies.com that I thought I should try. We're going on a trip to the mountains this weekend and I figured these would be perfect to take along with us.

The cookie itself was pretty easy to make. The tricky part was the caramel filling. It didn't thicken enough to spread on the cookie. It was very runny, but the recipe specifies that if the caramel is too thin, I had to add confectioner's sugar and it came out fine. Since our weekend trip falls right before Valentine's day, I wanted to be festive and make heart-shaped cookies, rather than the traditional round shapes. Overall, these cookies were delicious. I hope everyone likes them.

Cookies
1 1/2 cups (3 sticks) unsalted butter at room temperature
1 cup confectioner's sugar
2 Tbsp. granulated sugar
1/4 tsp. salt
1/4 tsp. almond extract
1/2 tsp. vanilla extract
1/3 cup ground almonds (ground slivered almonds in a food processor)
3 cups all purpose flour

Caramel Filling
2 cups firmly packed light brown sugar
1 cup half & half (or light cream, or evaporated milk)
3 Tbsp. unsalted butter
1/2 tsp. vanilla extract

1) Preheat oven to 350 deg F. Line cookie sheets with parchment paper.

2) Cream butter, confectioner's and granulated sugar until fluffy. Stir in salt, almond extract, vanilla extract, ground almonds and flour. Continue beating until well incorporated. Wrap the container and chill for 30 minutes.

3) Once chilled, roll out dough on a floured surface 1/4 inch thick. Cut desired shape of cookie and place on prepared cookie sheet. Bake for 12-14 minutes. Cool completely on wire racks before spreading filling)

4) To make the filling: combine brown sugar and cream in a medium saucepan and cook over medium heat. As it cooks, brush inner sides of pan with a pastry brush dipped in cold water to wipe away sugar crystals. Continue heating mixture to 238-240 deg F. Remove from heat and cool to 110 deg F.

5) Stir in butter. Beat mixture until it is thickened, about 8-10 minutes. If mixture is too thin, add confectioner's sugar until desired consistency is achieved. Add vanilla. Cool mixture in refrigerator for about 30 minutes to further firm up the filling. Spread on bottom side of one cookie. Place another cookie on top of filling. Dust with confectioner's sugar.

Sunday, February 6, 2011

Slow Cooker BBQ Pork Ribs


Its Superbowl Sunday. I don't really watch American Football, but I like to use these types of events as an excuse to try new recipes. And this kind of event almost always calls for BBQ. I found this recipe for Slow Cooker BBQ Ribs from my new favorite blog, What's Cookin, Chicago? that I had been saving up. I haven't had BBQ since the summertime. And I haven't tried Crock Pot BBQ either. So I was really excited to try this recipe out.

I love my Crock Pot. Its always a life saver for a busy mom like me. And it didn't disappoint me this time either. The pork came out so tender that it fell off the bone. I wasn't too happy about the sauce I used though. I'll probably use my favorite bottled sauce until I find the right homemade sauce. But I'll definitely be making BBQ this way whenever I can't fire up the grill. And the next time I do this again, I'll put some kind of a liner in the pot. Because it was a pain cleaning up the caked-on, charred sauce on the bottom. What a mess to clean up.

2-3 lb. pork ribs
2 cups prepared BBQ sauce (I used my homemade sauce, or any of your favorite BBQ sauce)
2 cloves garlic, minced
1 tsp. dried oregano

1) Combine BBQ sauce, garlic and oregano in a small bowl. Place ribs in Crock Pot. Pour sauce mixture over the ribs and cook on low for 6-8 hours, on on high for 4-5 hours.

BBQ Sauce


I've been wanting to make BBQ sauce from scratch for the longest time. But I haven't found a good recipe that caught my eye. Then I found this Slow Cooker BBQ Ribs recipe made of Homemade BBQ sauce, from What's Cookin, Chicago? which was adapted from the Neely's on the Food Network. So I had to give it a try.

It came out a little spicy, so I modified it and lessened the black pepper and added honey to the mix. I like sweet BBQ sauce. After using this on my pork ribs, however, I felt like it needed a lot of salt. I'm not sure if this is the BBQ sauce I'm looking for yet. I guess my search continues.

2 cups ketchup
1 cup water
1/2 cup apple cider vinegar
5 Tbsp. light brown sugar
5 Tbsp. sugar
1/4 cup honey
1 1/2 tsp. black pepper
1/2 Tbsp. onion powder
1 Tbsp. mustard
1 Tbsp. lemon juice
1 Tbsp. Worcestershire sauce

1) Combine all the ingredients in a medium saucepan and bring to a boil over medium heat. Reduce heat to low and continue simmering for 1 hour and 15 minutes, stirring frequently.

Saturday, February 5, 2011

Spam Musubi


Hubby decided to surprise me with breakfast this morning. So he locked me up in the bedroom while he prepared everything. The last time he did this, he made some Malasadas, a Portuguese style donut that is a favorite in Hawaii (and our family's favorite too). So it was pure torture when he made me wait in the room while I was able to smell whatever he was cooking.

He was finally done and to my surprise, he made another one of my favorite Hawaiian delicacy - Spam Musubi. I know that not everyone is a fan of Spam. But its quite popular in the Asian/Pacific Island culture. Especially in Hawaii. You see, in the old war days when food was scarce, food that was not perishable (like Spam) was brought into the islands for the soldiers. The locals had to find creative ways to make dishes out of Spam and the Spam Musubi was born. Its basically a Spam Sushi and it was a great, portable meal for a lot of the farmers in Hawaii.

So that was my brief history on this yummy dish. And hubby did a great job with it. It came out yummy. I'm glad he made this because I had been meaning to try to make it myself. I may have to ask him to make some again :)

1 1/2 cup uncooked glutinous, sweet rice
1 1/2 cup water
Nori sheets, cut in half
1/2 cup Soy Sauce
1/2 cup sugar (or more if you like it sweet)
1 Tbsp. oil
1 (12 oz) can Spam Lite, sliced 1/4 inch thick
Furikake

1) In a rice cooker pot or regular saucepan, pour in rice and water. Cook rice until done.

2) In a skillet, heat oil and lightly brown sliced spam on both sides.

3) Combine soy sauce and sugar in a small bowl. Pour in the skillet with spam. Cook until sauce begins to boil. Remove from heat.

4) To assemble the Musubi, use a square sushi mold. Place half a sheet of the Nori on the bottom. Place enough rice to reach about 3/4 up of the mold. Sprinkle with a little bit of the Furikake. Top with a slice of Spam. Fold the Nori over the Spam to seal. Serve warm.

*Note: you can also use a prepared teriyaki sauce in place of the soy sauce and sugar mixture.

**Furikake is a Japanese topping which is a mixture of dried fish, seaweed flakes and sesame seed, found in Asian stores

Wednesday, February 2, 2011

Korean Bulgogi Beef


Here's another great recipe for Bulgogi from What's Cookin, Chicago? It looked so yummy that I absolutely had to try it out. I love Korean BBQ, and I think I've made all kinds of different versions of it. From Korean BBQ Short Rib to Crockpot Korean Short Rib. So I guess this is another addition to my Korean BBQ repertoire.

Its been a while since we've eaten at a Korean BBQ restaurant. So I was really excited to make this. This came out so good. I served this wrapped in lettuce leaf and a side of white rice. It tastes just as good as what you'd find at a Korean restaurant. I am definitely making this again.

3 Tbsp. low sodium soy sauce
1 Tbsp. sesame oil
1 Tbsp. sesame seed, plus more for garnish
2 cloves garlic, minced
1 tsp. sugar
1 tsp. garlic powder
1 tsp. onion powder
1/2 tsp. salt
1/2 tsp black pepper
1/2 cup pear nectar (like Kern's or Jumex)
1 lb. sirloin beef, thinly sliced
1 carrot, julienned
1 green onion, chopped into 1-2 inch length
1/2 medium yellow onion, sliced

1) In a large resealable plastic bag, combine soy sauce, sesame oil, sesame seeds, garlic (fresh and powder), onion powder, salt, black pepper and pear nectar. Add beef and let marinate for 3 hours to overnight.

2) In a large skillet or wok, heat 1 tablespoon oil. Remove meat from marinade and place in hot skillet. Discard marinade. Brown beef on both sides and add carrots, green onions, and yellow onion. Cook until vegetables become tender but maintains a slight crunch. Garnish with more sesame seeds and serve over steamed white rice or lettuce leaves (to wrap like a burrito).


Tuesday, February 1, 2011

Smoky Mac 'n Cheese


I received a Betty Crocker calendar in the mail a few days ago and in it were some yummy looking recipes. The Smoky Mac 'n Cheese recipe caught my eye because we all know how much my daughter loves pasta and Mac & Cheese. So this was a must-try recipe for me.

This dish had so much flavor in it. Its a grown-up version of the old classic. With that said, my daughter wasn't too keen on it. Probably because of the flavor and a little bit of spice. I really liked it and will probably make this again for an adult crowd.

3 cups uncooked pasta
2 cups whipping cream
1/2 tsp salt (preferrably sea salt)
1/4 tsp. cayenne pepper
2 cups shredded smoked cheddar (I used regular cheddar and a drop of liquid smoke)
1 (14.5 oz) cans diced tomatoes, drained
1/4 cup sliced green onions
1/3 cup grated Parmesan cheese
1/3 cup plain bread crumbs
2 tsp. olive oil

1) Cook pasta according to directions. Return to saucepan; cover to keep warm.

2) Meanwhile, heat oven to 375 deg F. Grease a 13x9 inch glass baking dish. In a saucepan, heat whipping cream, mustard, salt, and cayenne pepper to boiling. Reduce heat and stir in cheese (and liquid smoke if using) with a wire whisk until smooth.

3) Pour sauce over cooked pasta. Stir in tomatoes and onions. Pour into baking dish. In a small bowl, mix Parmesan cheese and bread crumbs. Stir in oil. Sprinkle over top of pasta mixture. Bake uncovered 15-20 minutes or until edges are bubbly and top is golden brown.

Monday, January 31, 2011

Orange Banana Smoothie


Another great way to use up some of our oranges is to make a smoothie out of it. This is a concoction I made up a while back and thought it was fitting to make considering all the oranges we have. Its also a great and healthy snack. I used the leftovers to freeze in popsicle molds for my daughter to snack on later on.

6 heaping scoops of fat free vanilla frozen yogurt
1 cup freshly squeezed orange juice
1/2 cup milk
1 medium banana
zest of 1 orange

1) Place all ingredients in a blender. Blend until smooth. Place in a glass and garnish with a slice of orange.